Mechanical keyboards feel great when they are clean. The keys press smoother, the board sounds better, and the whole setup looks more cared for. Still, dust, crumbs, pet hair, skin oil, and drink residue build up faster than most people expect.
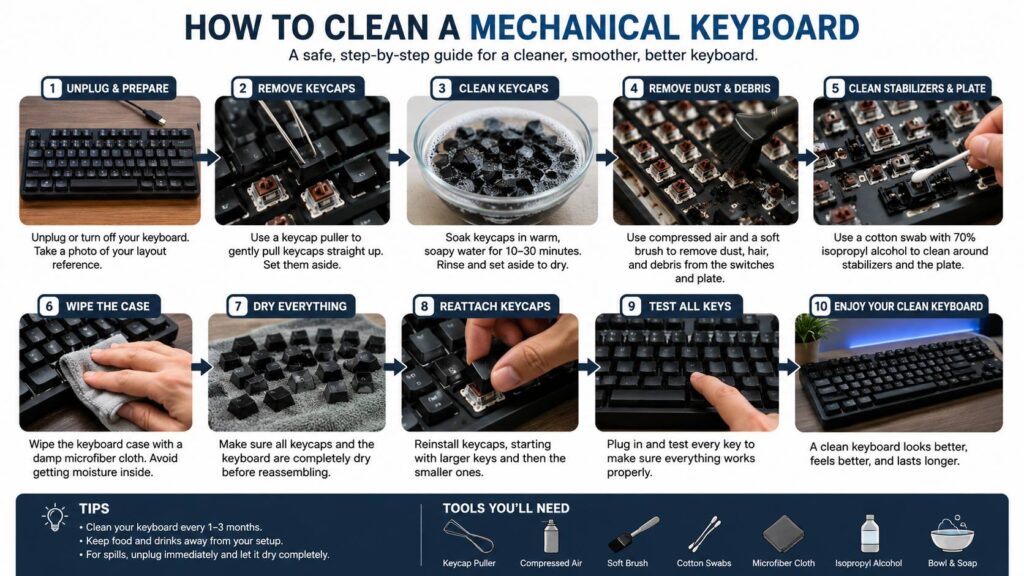
This guide explains how to clean a mechanical keyboard safely at home. It covers light cleaning, deep cleaning, keycap washing, sticky keys, spills, drying time, and simple care habits. The steps work for most wired, wireless, full-size, TKL, 75%, 65%, and compact mechanical keyboards.
The main goal is simple: clean the parts you can reach without damaging the switches or circuit board. So, keep liquid away from the PCB, USB port, battery, and switch openings. Clean keycaps separately, use dry tools first, and give every damp part enough time to dry.
What You Need Before Cleaning a Mechanical Keyboard
You do not need a repair shop setup. A few basic tools will handle most cleaning jobs.
Helpful tools:
- Keycap puller
- Microfiber cloth
- Soft brush or clean paintbrush
- Cotton swabs
- Bowl of warm water
- Mild dish soap
- Compressed air or electric air duster
- Small vacuum with a brush tip
- 70% isopropyl alcohol
- Clean towel
- Phone camera for a layout photo
A wire keycap puller is the one tool I would not skip. It costs very little, and it makes the job safer. Fingers can work on some keys, but they often pull caps at an angle. That can bend stems, scratch keycaps, or make large keys harder to remove.
Next, avoid harsh cleaners. Bleach, acetone, window cleaner, rough pads, and strong alcohol mixes can damage plastic, legends, coatings, and rubber feet. Paper towels can leave lint too, so microfiber is the better choice.
Turn Off the Keyboard and Take a Layout Photo
Start with power. Unplug a wired keyboard from the computer. For a wireless model, turn it off and remove the dongle. For a Bluetooth keyboard, switch it off before you clean around any keys.
Then take a clear photo of the full layout. This step sounds small, but it saves time later. Many boards use different key sizes on the bottom row. Some compact keyboards have unusual Shift, Enter, or Function keys. A photo gives you a quick map during reassembly.
After that, move the keyboard to a clean table with good light. Place a towel under it. Small keycaps and stabilizer parts can roll, so a towel helps keep everything in one place.
Start With a Quick Surface Clean
A light clean takes around 5 to 10 minutes. It works well for weekly care or for a board that only has dust and light crumbs.
First, turn the keyboard upside down. Shake it gently. Tap the back with your palm, but do not hit it hard. Loose debris should fall out.
Next, hold the keyboard at an angle and use short bursts of air between the keys. Move from left to right, then top to bottom. Short bursts give you more control and stop dust from getting pushed deeper into the case.
After that, brush around the keycaps with a soft brush. A small vacuum can pull out crumbs, but keep the suction low. Strong suction can pull loose keycaps off cheaper boards or compact layouts.
Then wipe the case and key tops with a dry microfiber cloth. For greasy spots, dampen the cloth slightly with water or 70% isopropyl alcohol. The cloth should feel barely damp, not wet.
Never spray cleaner straight onto the keyboard. Spray the cloth, then wipe.
Remove the Keycaps for a Deeper Clean
A deep clean makes sense every 2 to 3 months. Gamers, snack lovers, pet owners, and people who work long hours at the same desk often need it sooner.
Start with regular letter keys. Place the keycap puller under opposite sides of the cap. Pull straight up with steady pressure. Do not twist the cap.
Then move to larger keys. Spacebar, Enter, Shift, Backspace, and some numpad keys use stabilizers. These keys need more care. Pull gently from both sides, then lift straight up. Never yank a large key. A bent stabilizer can make the key feel loose, scratchy, or stuck.
Put the keycaps in small groups. Keep large keys separate. This makes reassembly faster.
One common issue appears after cleaning: the spacebar feels different. In many cases, the cap did not seat correctly on the stabilizer. Remove it, line it up again, and press evenly across the full length.
Wash the Keycaps Safely
Fill a bowl with warm water. Add a few drops of mild dish soap. The water should feel warm, not hot. Hot water can warp cheap plastic or damage weaker legends.
Drop the keycaps into the bowl. Stir them by hand, then let them soak for 10 to 30 minutes. Very dirty keycaps can soak for about an hour.
Next, scrub grime with a soft toothbrush or cloth. The sides of the keys often hold the most dirt. Skin oil and dust form dark lines there, especially on white or light gray caps.
After that, rinse every keycap under clean water. Soap residue can leave a slippery feel, so rinse well.
Then place the keycaps stem-side down on a clean towel. Pat the tops dry. Leave them out until fully dry. Overnight drying is the safest choice. Water can hide inside the stem and drip into a switch after reassembly.
Do not use high heat. A hair dryer on a hot setting can bend plastic. A room fan works better.
Clean the Keyboard Base
Once the keycaps are off, you will see the real mess. Hair wraps around switches. Dust collects near stabilizers. Crumbs hide along the plate.
Start dry. Use compressed air or an electric duster in short bursts. Hold the board at an angle so debris leaves the case. Then use a soft brush around each switch.
Next, wipe the top plate with a microfiber cloth. For sticky marks, use a cotton swab with a tiny amount of 70% isopropyl alcohol. The swab should not drip. Touch the plate and case only. Keep liquid away from switch openings.
For deep corners, use a dry cotton swab first. Then use a barely damp swab for marks that remain.
Do not rinse the keyboard base. Do not pour alcohol onto the switches. Water and too much alcohol can reach the PCB. That can cause chatter, dead keys, corrosion, or random inputs.
How to Clean Sticky Mechanical Keyboard Keys
Sticky keys usually come from soda, coffee, juice, sugar, sweat, or old dust mixed with oil. The fix changes based on where the mess sits.
For sticky keycaps, remove and wash them. This fixes many cases.
For sticky stabilizers, remove the large keycap and clean around the stabilizer wire with a cotton swab. Use a small amount of alcohol on the swab. Press the stabilizer stems a few times, then let the area dry.
For sticky switches, start with air and a dry brush. Press the switch stem several times. For hot-swap keyboards, remove the switch with a proper switch puller and inspect the socket area. Clean around the socket with dry tools first.
For soldered switches, do not pull the switch. That job needs soldering tools. A badly sticky soldered switch often needs replacement.
My honest opinion: pouring alcohol into a switch is risky. Some people suggest it online, but it can move grime deeper, change the feel, or wash lubricant into the wrong area. Try safer steps first.
What to Do After a Drink Spill
A spill needs quick action. Unplug the keyboard right away. For a wireless board, switch it off. Remove the cable and keep the keyboard upside down so liquid can drain.
Blot the area with a microfiber cloth. Press gently. Do not rub hard, since that can push liquid into gaps.
Next, remove the keycaps around the spill. Wash those caps with warm soapy water. Then dry them fully.
Set the keyboard upside down on a towel in a dry room. Give it at least 48 hours. More time is safer for larger spills.
Do not plug it in for a quick test. Power and moisture do not mix. Do not use a radiator, oven, or hot hair dryer. Heat can warp plastic and push moisture deeper into the case.
Sugary drinks cause the worst problems. Soda, sweet coffee, juice, and energy drinks leave sticky residue after the liquid dries. A high-value keyboard may need professional cleaning after a large spill.
Clean the Cable, Case, Desk Area, and Wrist Rest
A keyboard often gets dirty again fast if the desk area stays dusty. So, clean around the keyboard too.
Wipe the cable with a damp microfiber cloth, then dry it right away. Clean the case edges with cotton swabs. For tight seams, wrap a thin cloth around a toothpick and move slowly.
A plastic wrist rest can handle a cloth with mild soapy water. A leatherette wrist rest needs a barely damp cloth and quick drying. A wood wrist rest works best with a dry cloth or a cleaner made for finished wood.
Your mouse picks up the same oils and dust, so it makes sense to clean it during the same session. This guide on how to clean a mouse properly fits well with a full desk cleanup.
Put the Keyboard Back Together
Before reassembly, check every keycap. It must feel fully dry. Shake a few caps gently near your ear. Trapped water can hide inside stems.
Start with the large keys. Seat the stabilizer points carefully, then press evenly. Spacebar, Enter, Shift, and Backspace need patience.
Then install the smaller keycaps row by row. Use your photo to check the layout. Compact boards can look simple at first, but a few keys often have unusual sizes.
After that, plug in the keyboard and test every key. Use a text document or keyboard tester. Press each key once. Test Shift, Spacebar, Enter, Backspace, Ctrl, and Alt more than once.
Listen for strange sounds. A stiff Enter key, rattly spacebar, or uneven Shift key often means the keycap did not seat correctly. Remove it, line it up, and press again.
Common Cleaning Mistakes to Avoid
Most keyboard damage comes from rushing. The cleaning itself is not hard, but small mistakes can create annoying problems.
Avoid these mistakes:
- Pulling large keys too hard
- Spraying cleaner directly onto the board
- Using too much alcohol near switches
- Washing the keyboard base with water
- Reinstalling damp keycaps
- Drying parts with high heat
- Scrubbing printed legends with rough tools
- Losing track of non-standard key sizes
- Holding air cans upside down
- Forcing switches out of a soldered board
A safer rule is easy to follow: dry cleaning first, damp cloth second, liquid only on removed keycaps.
How Often Should You Clean a Mechanical Keyboard?
For normal home or office use, a simple schedule works well.
Weekly:
- Shake out crumbs
- Brush between keys
- Wipe the case and key tops
Monthly:
- Remove a few high-use keycaps
- Clean under Spacebar, Enter, WASD, and arrow keys
- Wipe the cable and wrist rest
Every 2 to 3 months:
- Remove all keycaps
- Wash the keycaps
- Brush and wipe the plate
- Test every key after reassembly
Right after a spill:
- Unplug the keyboard
- Drain it upside down
- Remove affected keycaps
- Dry the board for at least 48 hours
The best habit is simple: keep food and open drinks away from the keyboard. It sounds strict, but it prevents most cleaning problems. Coffee near the USB side of a keyboard is one of the fastest ways to ruin a good board.
Why Cleaning Can Change Keyboard Sound
A clean keyboard can sound different. Dust, crumbs, and loose grime can make keys sound scratchy or uneven. Once you remove that debris, the board often sounds sharper and cleaner.
Still, cleaning will not fix every sound issue. Rattle, hollow case noise, and ping usually come from stabilizers, keycaps, switches, foam, or case design. Cleaning helps, but it does not replace tuning.
For a quieter or smoother board, cleaning is the first step. After that, you can look at stabilizer tuning, desk mats, switch choice, and keycap material. This guide on how to make a keyboard sound better covers those upgrades in more detail.
Extra Tips for RGB, Hot-Swap, and Low-Profile Keyboards
RGB keyboards show dust faster. The light shines through gaps, so even small debris stands out. Clean the plate more often with a soft brush.
Hot-swap keyboards are easier to service. You can remove switches with a switch puller, inspect the socket, and clean the plate more deeply. Still, pull switches straight up. Bent pins are a common hot-swap problem.
Low-profile mechanical keyboards need a lighter hand. Their caps and stabilizers can use thinner parts. Pull straight up and check the manual before removing unusual keycaps.
White keycaps need more care too. Oils and dust show faster on light plastic. Mild soap and warm water work well. Strong cleaners can fade legends or change the surface finish.
Final Advice
Cleaning a mechanical keyboard takes patience, not special skill. Start with a dry clean. Take a layout photo. Remove keycaps with care. Wash the caps in warm soapy water, then dry them fully. Clean the base with air, a brush, microfiber, and light cotton swabs.
The biggest rule is to keep liquid away from the switches and PCB. Once you follow that rule, the process stays safe and simple.
A clean mechanical keyboard feels better under your fingers. The keys stop crunching. The case looks fresh. Sticky spots go away. Plus, regular cleaning protects the switches, stabilizers, and board from months of dirt.