
A keyboard can feel nice under your fingers and still sound cheap. Some keys rattle. The spacebar can tick on one side. The case can echo across the desk. After a few hours, that sharp sound starts to get annoying.
The good news is simple. You do not need to buy a new keyboard right away. In many cases, a few small changes can make your keyboard sound deeper, cleaner, and more pleasant. Some fixes take five minutes. Others take a quiet afternoon and a little patience.
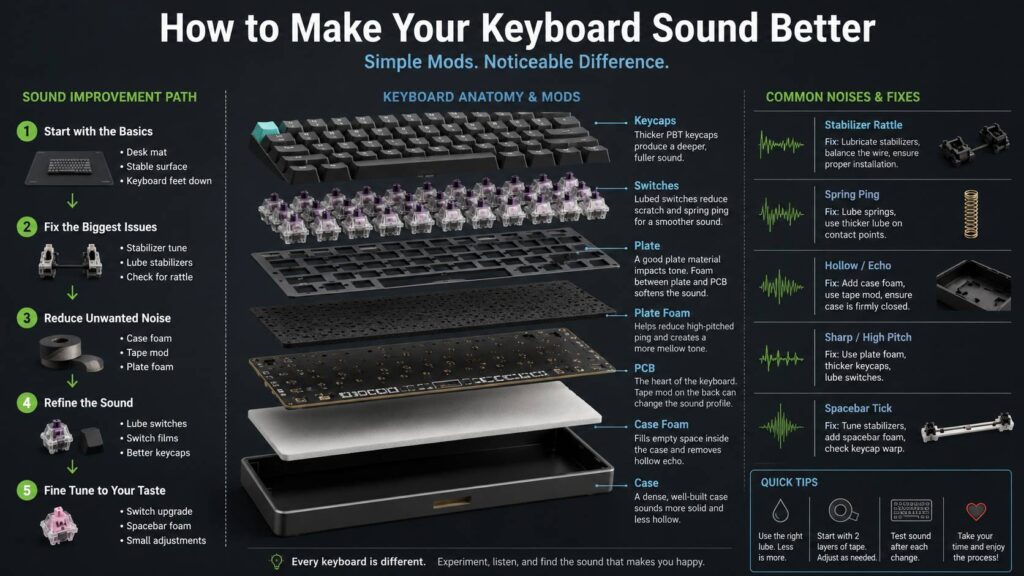
This guide covers the most useful ways to make a keyboard sound better. You will learn how desk mats, keycaps, stabilizers, switches, foam, tape, and cleaning affect sound. Along the way, you will see which upgrades matter most and which ones are easy to overdo.
What Makes a Keyboard Sound Better?
A good keyboard sound feels clean and controlled. Each key press has a clear tone. The board does not buzz, ring, or echo after every tap.
Most people want one of two sounds. Some prefer a deep, soft sound often called “thock.” Others like a brighter, crisp “clack.” Neither one is wrong. Still, the best sound usually comes from balance, not from chasing one trendy noise.
A better keyboard usually has:
- Less spacebar rattle
- Less spring ping
- Less hollow case sound
- Cleaner stabilizers
- Smoother switches
- A softer bottom-out feel
- More even sound across all keys
So, where do you start? Start with the easiest changes first. They cost less, carry less risk, and often fix the biggest problems.
Start With a Desk Mat
A desk mat is the simplest keyboard sound upgrade. It sits under the keyboard and absorbs vibration from the desk.
A hard desk can make a keyboard sound louder and sharper. By contrast, a soft desk mat makes the sound warmer and less harsh. It can also reduce that empty “plastic box” noise many budget keyboards have.
This fix works with almost every keyboard. Mechanical boards, membrane boards, low-profile keyboards, and even office keyboards can sound better on a mat.
For the best result, choose a thick desk mat with a soft surface. A thin mat still helps, but the change feels smaller. Plus, the mat improves mouse control and gives your wrists a softer area to rest on.
If your keyboard sounds sharp, try this first. It takes no tools, and you can hear the change right away.
Check the Keyboard Feet and Desk Surface
Next, check how the keyboard sits on the desk. A keyboard that rocks even a little can sound worse than it should.
Place the keyboard on your desk and press each corner. It should stay flat. Then type with the rear feet raised. After that, fold the feet down and type again. Many keyboards sound better flat, since raised feet can send more vibration into the case.
The desk surface matters too. A glass desk, thin table, or hollow desktop can make the keyboard sound louder. A heavy wooden desk often sounds better. A desk mat helps here as well, especially on hard surfaces.
Small details matter more than they seem. Rubber feet, desk material, and typing angle all change the final sound.
Clean the Keyboard Before Buying Parts
Before you spend money, clean the keyboard. Dust, crumbs, hair, and sticky marks can change both sound and feel.
Start with a safe basic clean:
- Unplug the keyboard
- Shake out loose debris
- Use a soft brush between the keys
- Use compressed air in short bursts
- Wipe the keycaps with a damp microfiber cloth
- Let everything dry before plugging it back in
For mechanical keyboards, you can remove the keycaps with a keycap puller. Then clean the plate area with a soft brush. Be gentle around stabilizers and switches.
A dirty keyboard can make keys sound uneven. Larger keys can rattle more when debris sits near the stabilizer. After cleaning, you get a better baseline. Then you can hear which problems still need work.
Replace Thin Keycaps
Keycaps change keyboard sound more than many people expect. Thin keycaps often sound light, sharp, and a bit cheap. Thicker keycaps usually sound fuller.
Most budget keyboards use thin ABS keycaps. They can feel smooth over time, and they often create a higher-pitched sound. Thick PBT keycaps feel more textured and often produce a deeper tone.
Profile affects sound too. Cherry, OEM, SA, and low-profile keycaps all create different tones. Taller keycaps can sound fuller, but they can feel less familiar at first. Lower caps often sound sharper and lighter.
Still, keycaps do not fix every problem. A rattly spacebar will still rattle with better caps. For this reason, keycaps work best after you fix stabilizers and case noise.
Fix Stabilizer Rattle
Stabilizers support larger keys. These include the spacebar, Enter, Backspace, Shift, and some numpad keys.
Bad stabilizers create ticking, rattling, or uneven sound. The spacebar usually exposes the problem first. One side can sound clean, then the other side can tick with every press.
This is one of the biggest reasons a keyboard sounds cheap. Even a nice keyboard can feel poor if the stabilizers rattle.
To improve stabilizers, remove the large keycap and press each side of the key. Listen for ticking. Then apply a small amount of keyboard lubricant to the contact points where the wire meets the housing. Use very little. Too much lube makes the key feel slow and mushy.
For a deeper fix, some users balance the stabilizer wire. That means both ends sit level. This takes patience, but it can remove stubborn ticking.
In real use, stabilizer tuning often gives the biggest sound upgrade. A clean spacebar makes the whole board feel more expensive.
Lubricate the Switches
Switch lube can make a mechanical keyboard sound smoother. It can reduce scratch, spring noise, and harsh contact sound.
Linear switches usually gain the most from lube. They become smoother and often sound softer. Tactile switches need more care. Too much lube can reduce the bump and make the switch feel dull. Clicky switches are tricky, since normal lube can damage the click feel.
Hot-swappable keyboards make this job easier. You can pull out each switch, open it, lube it, then place it back. Soldered keyboards make the job much harder, so most beginners should avoid switch lubing on soldered boards.
Use a small brush and a thin coat. The switch should not look wet. The goal is to reduce friction, not drown the parts.
This mod takes time. A compact keyboard still has many switches. Still, the result can feel worth it if the board has scratchy or pingy switches.
Add Switch Films
Switch films sit between the top and bottom switch housing. They reduce movement inside the switch.
Loose switch housings can create a thin, uneven sound. Films tighten that fit and make the sound cleaner. They can help older switches or cheaper switches that have noticeable housing wobble.
This mod works best during switch lubing. Since you already open each switch, adding films at the same time saves effort.
Not every switch needs films. Many newer switches already fit tightly. In that case, films can make little difference or even make the switch hard to close. So test one switch first before filming the whole board.
Try the Tape Mod
The tape mod is cheap and popular for a reason. It often changes the sound fast.
The idea is simple. You place painter’s tape on the back of the PCB. This can make the keyboard sound deeper, louder, or poppier, based on the board.
Use painter’s tape only. Avoid duct tape, electrical tape, or strong adhesive tape. Painter’s tape removes more cleanly and creates less mess.
Start with two layers. Then test the sound. If you want more change, add a third layer. Too many layers can make the board sound strange or stop the case from closing well.
Be careful with wireless keyboards. Keep tape away from batteries, connectors, lights, and ribbon cables. If the keyboard feels tight during reassembly, stop and remove a layer.
For many budget mechanical boards, this mod gives a fun and noticeable change.
Add Case Foam
Case foam fills empty space inside the keyboard. That empty space can create echo, especially in plastic cases.
A thin layer of foam can make the board sound more solid. It can reduce hollow noise and soften the bottom-out sound.
Common materials include:
- PE foam
- EVA foam
- Poron foam
- Neoprene foam
- Thin shelf liner
Do not use foam that is too thick. The case should close without force. If you need to squeeze the case shut, the foam is too thick. Pressure inside the case can bend parts, change the feel, or create new problems.
This mod works well on hollow budget keyboards. Metal cases can benefit too, but the change varies from board to board.
Use Plate Foam for a Softer Sound
Plate foam sits between the plate and PCB. It changes both sound and feel.
This foam can reduce sharpness and make the keyboard sound more controlled. It can also make the typing feel softer. Some users love that muted feel. Others think it removes too much character from the board.
Plate foam takes more work than case foam. You often need to remove keycaps, switches, and several screws. For hot-swappable keyboards, the job is manageable. For soldered keyboards, it becomes much more difficult.
Use plate foam if the keyboard sounds harsh or too sharp. Skip it if you like a lively, crisp sound.
Fix Case Ping and Spring Ping
Ping sounds like a small metal ring after a key press. It can come from the switch springs, the plate, or the case.
Start with simple checks:
- Put the keyboard on a desk mat
- Use the keyboard with the feet flat
- Tighten loose screws gently
- Add case foam
- Lube the switches or springs
Loose screws can create strange vibration. Tighten them with care. Plastic screw posts can crack if you force them.
Spring ping comes from inside the switch. Lubing the spring can reduce it. Some users bag-lube springs with a tiny amount of oil. This can work well, but too much oil creates a mess.
If ping remains after foam and switch work, the keyboard design itself may be the cause. Some metal plates and cases ring more than others.
Change the Switches
Switches shape much of the keyboard sound. A switch swap can make a bigger change than foam or tape.
Linear switches often sound smooth and deeper. Tactile switches add a bump and can sound sharper. Clicky switches sound loud by design, so they do not suit quiet rooms or shared spaces.
Factory-lubed switches can save time. Many current switches sound good right away, though some factory lube jobs feel uneven.
Hot-swappable boards make switch swaps simple. Pull the old switch, check the pins on the new one, then press it in straight. Bent pins happen often, so never force a switch into the socket.
Before buying a full set, test a few switches. A small tester costs less than a bad full set. If you are still deciding whether the switch to mechanical is worth it, this guide on do you really need a mechanical keyboard can help you compare the real benefits.
Improve the Spacebar Sound
The spacebar is the hardest key to tune. It is large, hollow, and supported by stabilizers. So it often makes the most noise.
To improve the spacebar, start with stabilizers. Tune them first. Then check the keycap itself. Some spacebars arrive slightly warped, and a warped spacebar can tick even after lubing.
You can add light foam inside the spacebar. This can make it sound deeper and less hollow. Use a small amount only. Too much foam adds weight and can slow the key return.
Try these fixes in order:
- Tune the stabilizers
- Check for spacebar warp
- Add light foam inside the spacebar
- Try a thicker keycap set
- Test the spacebar on a flat desk mat
A good spacebar makes the whole keyboard feel better. A bad one ruins the typing sound, even if the rest of the board sounds fine.
Make a Membrane Keyboard Sound Better
Membrane keyboards have fewer mod options than mechanical keyboards. Still, you can improve the sound.
A desk mat helps a lot. Cleaning helps too. Dust under the keys can make the sound uneven and scratchy.
Some membrane keyboards let you remove keycaps. Others use fragile clips, so check the design first. If the keycaps resist, do not force them.
For a safe improvement, try this order:
- Clean the keyboard
- Use a thick desk mat
- Keep the keyboard flat
- Replace worn keycaps only if the model supports it
- Add thin case foam only if the keyboard opens safely
A cheap membrane keyboard will not sound like a custom mechanical board. Still, simple changes can make it quieter and less harsh.
Think About Layout and Typing Comfort Too
Sound matters, but comfort matters just as much. A keyboard that sounds good can still feel wrong after long typing sessions.
Layout plays a role here. Compact keyboards save desk space but can feel cramped. Full-size keyboards give you every key but take more room. Split-style layouts can place your hands at a more natural angle.
For example, an Alice-style board uses a curved split layout. It looks unusual at first, but some people find it more comfortable for long typing sessions. This guide explains what is an Alice keyboard and why the layout feels different from a standard keyboard.
If your hands feel tense, do not focus only on sound. Key height, layout, switch weight, and desk position all affect daily comfort.
Best Upgrade Order for Beginners
The best plan is simple: start cheap, then move to harder mods.
Use this order for most keyboards:
- Add a desk mat
- Clean the keyboard
- Test the keyboard with feet flat
- Tune the stabilizers
- Try thicker keycaps
- Add case foam
- Try the tape mod
- Lube or replace switches
- Add plate foam
- Add switch films
This order targets the biggest problems first. It also helps you avoid wasting money.
For most people, the top three fixes are desk mat, stabilizer tuning, and case foam. These changes improve many keyboards without turning the project into a full rebuild.
Common Mistakes to Avoid
The biggest mistake is using too much lube. More lube does not create a better sound. It can make switches sticky, slow, and uneven.
Another common mistake is using foam that is too thick. The keyboard case must close naturally. Extra pressure inside the case can damage parts or change the typing feel.
Strong tape can create problems too. Painter’s tape works best for the tape mod. Heavy adhesive tape can leave residue and make future repairs harder.
Do not force switches into hot-swap sockets. Check the pins first. A bent pin can stop the key from working.
Wireless keyboards need extra care. Keep tools and foam away from the battery. A small sound upgrade is not worth damaging the keyboard.
Is It Worth Modding a Cheap Keyboard?
Yes, up to a point. A cheap hot-swappable mechanical keyboard can improve a lot with a desk mat, stabilizer tuning, foam, tape, and better keycaps.
Still, every keyboard has limits. Thin cases, poor stabilizers, weak plates, and loose switches can hold back the sound. After a certain point, a better keyboard makes more sense than more parts.
A smart budget is simple. Do not spend more on mods than the keyboard is worth, unless you enjoy the hobby side of it. For a low-cost board, focus on the fixes that give the biggest sound change first.
Final Verdict
You can make a keyboard sound better without buying a new one. Start with the simple fixes. Use a desk mat. Clean the board. Check the feet. Then tune the stabilizers.
After that, keycaps, foam, tape, and switches can shape the sound even more. Go one step at a time. Test the keyboard after each change. That way, you know what actually made a difference.
A great keyboard sound does not need to be the deepest sound online. It needs to feel clean, even, and pleasant during real typing. Fix the rattle first. Then reduce ping. After that, shape the tone to match your taste.