Why Cleaning Your Mouse Matters
A computer mouse gets dirty faster than most people think. Your hand touches it for hours, so skin oil, sweat, dust, crumbs, and pet hair build up on the surface. After some time, the buttons feel greasy, the scroll wheel becomes rough, and the sensor may stop tracking as smoothly as it once did.
For most people, the problem starts slowly. The mouse still works, but it feels less pleasant to use. Then the scroll wheel begins to skip. After that, the pointer may jump on the screen. In many cases, the mouse is not broken. It just needs a careful clean.
A clean mouse feels better in the hand. It glides better across the mouse pad, and it looks much newer too. More than that, regular cleaning helps prevent sticky buttons, poor tracking, and grime around the sensor. That matters for office work, gaming, photo editing, school work, and everyday browsing.
The best part is that you do not need expensive tools. A microfiber cloth, cotton swabs, mild soap, water, and a little patience can do the job well.
What You Need to Clean a Mouse Safely
Start with simple tools. Strong chemicals are not needed, and in many cases, they can damage the finish.
Use these items:
- A clean microfiber cloth
- Cotton swabs
- Mild dish soap
- A small bowl of water
- A soft toothpick or plastic pick
- A handheld air blower or short bursts of compressed air
- A dry towel
- Alcohol wipes for hard outer surfaces only
Avoid these items:
- Bleach
- Acetone
- Nail polish remover
- Window cleaner
- Harsh kitchen sprays
- Abrasive sponges
- Metal picks
- Very wet cloths
- Direct sprays into the mouse
Strong cleaners can remove printed logos, damage rubber grips, or make soft-touch coatings feel sticky. So, keep the cleaning gentle. A slightly damp cloth is enough for most dirt.
One small tip from real use: do not use paper towels for the main shell if the mouse has a glossy finish. Paper towels can leave tiny scratches or lint. Microfiber feels safer and leaves a cleaner surface.
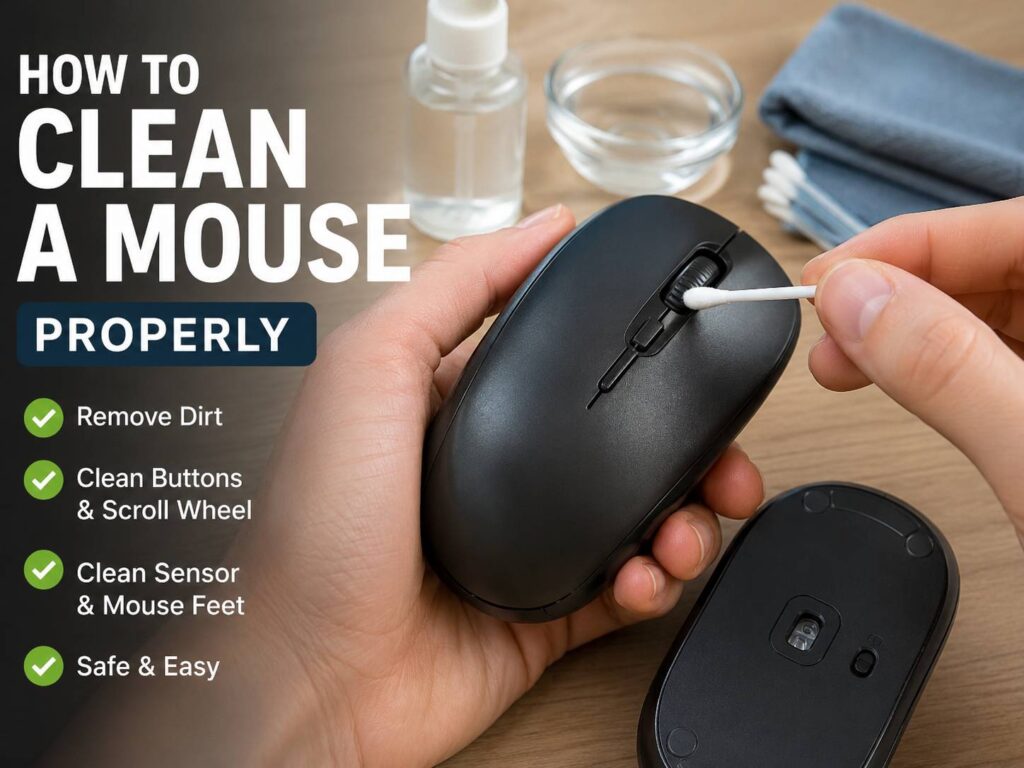
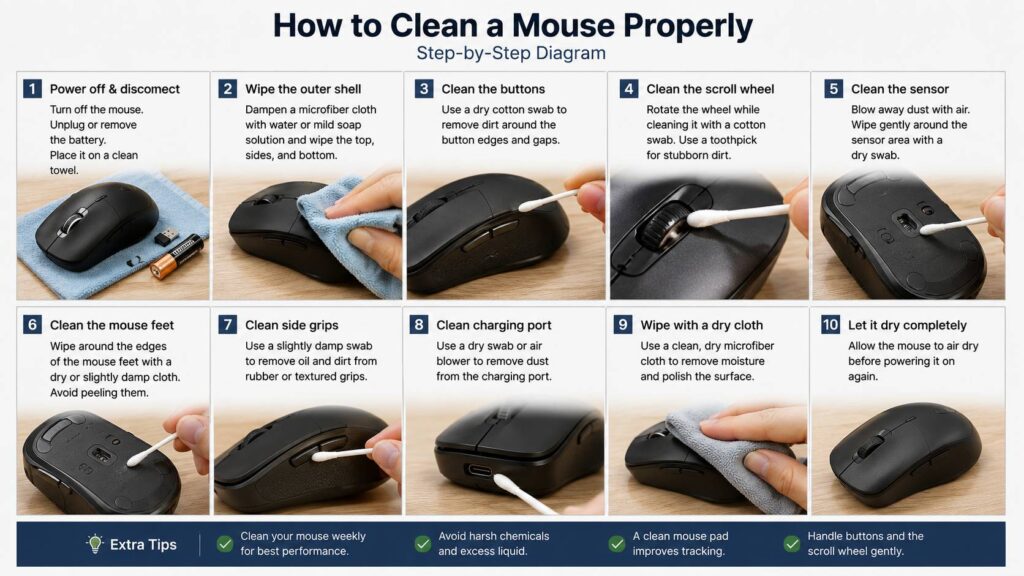
Turn Off and Disconnect the Mouse First
Before cleaning, turn the mouse off. If it is wired, unplug it from the computer. If it is wireless, switch it off and remove the battery if the design allows it. For a rechargeable mouse, make sure it is powered off before you start.
This step sounds basic, but it matters. It prevents accidental clicks, protects the sensor area, and lowers the risk of moisture reaching powered electronics.
Next, place the mouse on a clean towel. Good lighting helps here. Dirt around the scroll wheel, side buttons, and sensor is easier to see under a desk lamp.
If your mouse has a USB receiver stored inside, remove it before cleaning. Then clean the storage slot with a dry cotton swab. Do not put water into that area.
Clean the Outer Shell
Start with the top and sides of the mouse. Lightly dampen a microfiber cloth with water. The cloth should feel barely wet, not soaked. Wipe the palm rest, left button, right button, side panels, and bottom shell.
For greasy buildup, mix a tiny drop of mild dish soap with water. Dip a corner of the cloth into the mix, wring it out well, then wipe the surface gently. After that, use a clean damp cloth with plain water to remove any soap film. Then dry the mouse right away.
Do not spray cleaner directly onto the mouse. Liquid can run into the button gaps, scroll wheel area, charging port, or sensor opening. That can cause trouble, especially on wireless and gaming mice.
Matte mice need a softer touch. Some matte coatings become shiny if you scrub too hard. So, use slow passes with light pressure instead of aggressive rubbing.
Clean the Mouse Buttons
Mouse buttons collect dirt around the edges. This is common on left and right clicks, side buttons, DPI buttons, and thumb buttons. Over time, that grime can make clicks feel less crisp.
Use a dry cotton swab first. Run it along the button edges and seams. Then press each button gently and clean around the gap while the button moves slightly. This helps lift dirt from the edge.
If the dirt does not come off, dampen the cotton swab with a small amount of water. It should not drip. Clean the gap again, then dry the area with another swab.
For sticky side buttons, repeat the same process. Side buttons often collect sweat and skin oil, mainly on gaming mice and ergonomic mice. A light clean once a week keeps them feeling much better.
Do not pour alcohol near the switches. The button may work fine right away, but liquid can travel inside. Later, it can affect the click feel or leave residue.
Clean the Scroll Wheel
The scroll wheel is one of the dirtiest parts of a mouse. Dust, crumbs, and skin oil collect inside the grooves. Then scrolling starts to feel rough, noisy, or inconsistent.
Turn the mouse upside down and rotate the wheel. Use a dry cotton swab to clean both sides of the wheel. Next, lightly dampen another cotton swab and wipe the wheel surface while slowly turning it.
If grime is stuck between the grooves, use a toothpick or soft plastic pick. Be gentle. The goal is to lift dirt from the surface, not push debris deeper inside the mouse.
A handheld air blower can help too. Use short bursts around the wheel, then wipe again with a cotton swab. If you use compressed air, keep the can upright. Short bursts are safer than one long blast.
This part takes a little patience. Still, it makes a big difference. A clean scroll wheel feels smoother and more controlled.
Clean the Mouse Sensor
A dirty sensor can make the cursor jump, skip, or move unevenly. This often happens when dust, lint, or hair gets stuck near the sensor opening.
Turn the mouse over and inspect the sensor area. Blow away loose dust with a handheld air blower. Then use a dry cotton swab around the sensor opening. If you see sticky grime, use a barely damp swab and wipe gently.
Do not press hard on the sensor lens. Do not use sharp tools inside the opening. Also, do not flood the area with alcohol or water.
After cleaning, test the mouse on a clean surface. If the pointer still jumps, the mouse pad may be dirty. In fact, a dusty mouse pad can cause tracking issues even after the mouse itself looks clean.
Clean the Mouse Feet
Mouse feet, often called mouse skates, help the mouse glide smoothly. They sit on the bottom of the mouse and can collect dust around the edges. Once dirt builds up there, the mouse may feel slow or scratchy.
Use a dry cotton swab around each foot. If grime remains, use a slightly damp cloth and clean the edges. Try not to lift the feet. Once they peel, they may not sit flat again.
For stubborn dirt, use a toothpick with light pressure. Stop right away if the foot starts to lift. Scraping too hard can damage the glide surface.
If your mouse feels rough after cleaning, the feet may be worn. In that case, replacement skates can help. Many users prefer PTFE skates because they glide smoothly on cloth and hard pads. You can learn more here: what are PTFE mouse feet.
Clean a Gaming Mouse Without Damaging It
Gaming mice need extra care since they often have more buttons, RGB lighting, textured grips, low-friction feet, and open shell designs.
Start with the same basic method. Use a microfiber cloth for the shell, cotton swabs for button gaps, and air for the sensor area. Then clean around side buttons, DPI buttons, and the scroll wheel.
For RGB mice, keep moisture away from light strips and gaps. For USB-C charging ports, use air instead of a wet swab. If your gaming mouse has a honeycomb shell, use air first to remove dust from inside the holes. Then wipe the outside with a lightly damp cloth.
Do not pour cleaner into honeycomb holes. That may sound obvious, but it is a common mistake. Liquid can reach the board inside the mouse.
Wireless gaming mice need one more step. Clean the charging contacts with a dry cotton swab. If they look greasy, use a barely damp swab, then dry them right away.
Clean a Wireless Mouse or Bluetooth Mouse
Wireless and Bluetooth mice are easy to clean, but battery areas need care. Turn the mouse off and remove the batteries if possible. Then open the battery cover and check for dust or residue.
Use a dry cotton swab inside the battery compartment. Do not use water there. Battery contacts can corrode, and moisture makes the problem worse.
If the mouse has a built-in rechargeable battery, do not open it unless the manufacturer designed it for that. Clean only the outside, the sensor area, the feet, and the charging port area.
For the charging port, use air. Do not insert a wet swab into USB-C or micro-USB ports. Small ports trap liquid easily, and that can cause charging problems.
After cleaning, let the mouse sit for a few minutes before turning it on again. This gives any light moisture time to dry.
How to Disinfect a Mouse Safely
Cleaning removes dirt. Disinfecting reduces germs on the surface. For a shared mouse or a mouse used during illness, disinfecting makes sense. Still, it must be done carefully.
First, remove visible dirt with a damp microfiber cloth. Then use an alcohol wipe on hard outer surfaces only. Keep the wipe away from the sensor, ports, scroll wheel gap, and button seams.
Do not scrub rubber grips with alcohol every day. Over time, alcohol can dry them out or change the texture. Printed logos can fade too.
A safer routine is simple:
- Clean the mouse first.
- Wipe only hard outer surfaces.
- Use very little moisture.
- Dry the mouse right away.
- Let it air dry before use.
For everyday home use, gentle cleaning matters more than harsh disinfecting. A mouse cleaned weekly usually feels nicer and stays in better shape than one cleaned rarely with strong chemicals.
Clean the Mouse Pad and Desk Area Too
A clean mouse can still feel bad on a dirty mouse pad. Cloth pads collect sweat, dust, food crumbs, and skin oil. Hard pads collect smudges and tiny particles that can affect glide.
For a cloth mouse pad, check the care label first. Many basic cloth pads can be washed with lukewarm water and mild soap. Rinse well, then let the pad dry flat for a full day. Do not use it while damp.
For a hard mouse pad, wipe it with a damp microfiber cloth and dry it right away.
The desk surface matters too. Dust from the room, pets, and floors can end up around your setup. If dust builds up fast in your home office, the floor may be part of the problem. For a cleaner room overall, this guide on robot vacuum and mop vs vacuum-only robot can help you compare which cleaning tool fits your space better.
How Often Should You Clean Your Mouse?
A simple schedule works best. You do not need to deep clean the mouse every day, but small habits prevent heavy buildup.
Use this routine:
- Every day: Wipe the mouse with a dry microfiber cloth if your hands get sweaty.
- Once a week: Clean the shell, buttons, scroll wheel, and sensor area.
- Once a month: Clean the feet, charging port, mouse pad, and desk area.
- After spills: Turn the mouse off, unplug it, and clean the outside right away.
- After illness: Clean first, then disinfect the hard outer surfaces carefully.
People who eat at the desk should clean more often. Pet owners should do the same. Hair and dust can collect near the sensor and feet faster than expected.
Common Mouse Cleaning Mistakes
The biggest mistake is using too much liquid. A mouse has small gaps everywhere. Water or cleaner can run into places you cannot dry.
Avoid these mistakes:
- Spraying cleaner directly onto the mouse
- Scrubbing soft-touch coatings too hard
- Using acetone or nail polish remover
- Cleaning the sensor with sharp tools
- Soaking the scroll wheel
- Pulling up the mouse feet
- Charging the mouse before it dries
- Using strong alcohol on rubber grips too often
- Forgetting to clean the mouse pad
Another common issue is rushing the drying step. Even if the mouse looks dry, moisture can stay near button gaps or the charging port. Give it a little time before turning it back on.
What to Do If the Mouse Still Feels Dirty
Sometimes one clean is not enough. Old grime can sit deep around the scroll wheel, side buttons, or feet. In that case, repeat the process with dry tools first. Then use a lightly damp swab only where needed.
If the scroll wheel still skips, dirt may be inside the mechanism. Do not open the mouse unless you know the model and accept the risk. Many mice hide screws under the feet, and removing those feet can ruin the glide.
If the cursor still jumps, test the mouse on another pad or surface. If it works better there, the pad is the problem. If it still skips on every surface, the sensor may be damaged or the mouse may be near the end of its life.
For an expensive gaming mouse, replacement skates or a new mouse pad can be worth it. For a cheap office mouse, replacing the mouse may make more sense than taking it apart.
Final Verdict
Cleaning a mouse properly is easy, but it rewards patience. Use a microfiber cloth for the shell, cotton swabs for small gaps, air for the sensor, and very little moisture. Keep strong cleaners away from rubber grips, printed logos, ports, and internal parts.
A quick weekly clean prevents sticky buttons, rough scrolling, poor tracking, and slow glide. It also makes the mouse feel better every time you use it.
For gaming mice, office mice, wireless mice, and Bluetooth mice, the safest rule stays the same: clean gently, keep liquid out, and let everything dry before use.