Buying a new television should feel exciting. Yet the first picture you see at home often looks nothing like the films, shows, and games were meant to look.
Most TVs arrive with several automatic features active. Some make the screen stand out in a bright shop. Others collect viewing data, play promotional content, change the brightness, or add extra processing. So, the default setup may look bold, but it can feel tiring after a full evening of watching TV.
A few small changes can make a big difference. First, you can get more natural colors. Then, you can reduce strange motion, improve gaming response, and stop the screen from changing brightness on its own. At the same time, you can limit unwanted tracking and remove some home-screen clutter.
The names of these settings differ across Samsung, LG, Sony, TCL, Hisense, Philips, Roku TV, Fire TV, and Google TV. Still, the purpose of each feature is often very similar.
Here are the main new TV settings to disable, plus the settings you should leave active.
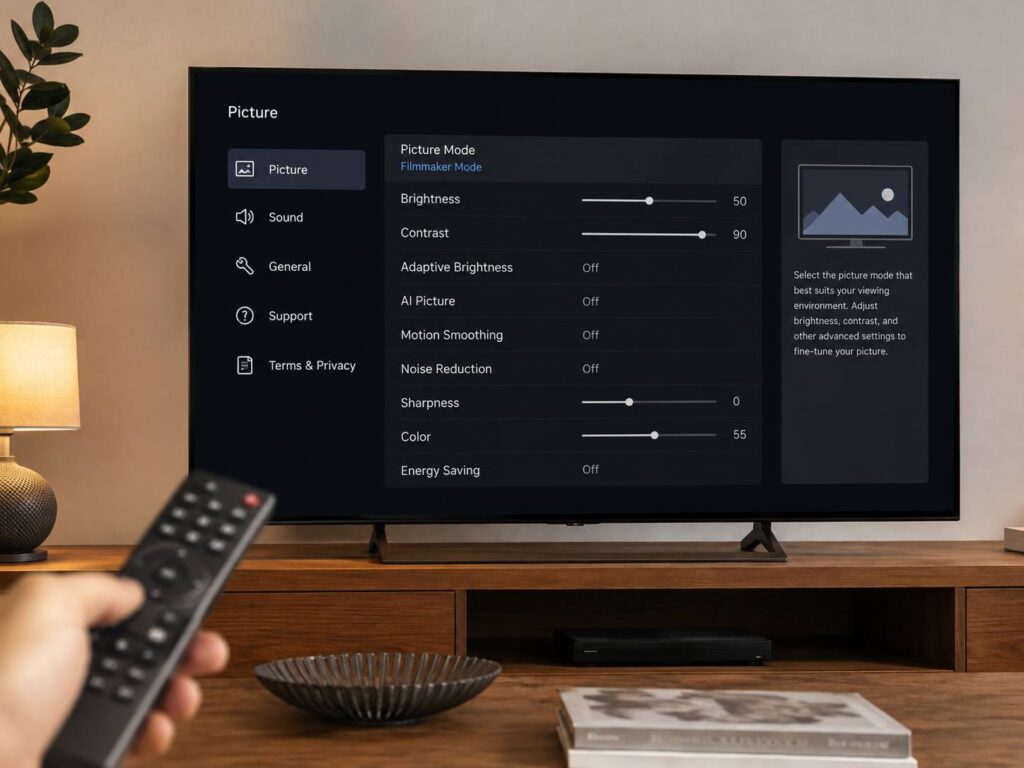
Start by Changing the Default Picture Mode
Before changing individual controls, check the current picture mode. Many televisions arrive in Standard, Eco, Vivid, or Shop mode.
At first, Vivid mode can look impressive. Colors appear stronger, white areas look brighter, and edges appear sharper. Yet this mode rarely looks natural in a normal living room.
Faces may look too red. Grass can appear almost fluorescent. Bright clouds can lose texture, and dark clothes may become solid black shapes.
Instead, try one of these picture modes:
- Filmmaker Mode
- Cinema
- Movie
- Professional
- Custom
- Cinema Home
Filmmaker Mode is a good place to start for films and streaming shows. It removes much of the extra processing and gives you a calmer image.
Still, room lighting matters. A dark Cinema preset may look too dim during a sunny afternoon. So, raise the panel brightness when needed, but avoid increasing every processing setting at the same time.
Turn Off Motion Smoothing
Motion smoothing is one of the first new TV settings to disable. It creates artificial frames between the original frames in a film or show.
The extra frames make movement look smoother. Yet they can make a cinematic film look like a daytime television program. Many viewers call this the soap opera effect.
TV brands use several names for motion smoothing:
- Samsung Picture Clarity
- Samsung Auto Motion Plus
- LG TruMotion
- Sony Motionflow
- TCL Action Smoothing
- Hisense Motion Enhancement
- Philips motion processing
- Roku Action Smoothing
For films and drama series, switch it off. Next, replay a scene with slow camera movement. The image may look slightly less smooth, but it should feel more natural.
Motion processing can create other problems too. For example, a football may leave a faint trail. A fast-moving person may have a blurry outline. Subtitles can flicker during camera movement.
Sports can benefit from a low setting. Still, use the weakest level that looks comfortable. High settings often create more visual errors than they fix.
For gaming, keep motion smoothing off. It adds extra processing and can increase input delay. Game Mode normally disables it, but checking the menu is still a good idea.
Disable AI Picture Processing
Many modern televisions include AI Picture, Intelligent Mode, Adaptive Picture, or scene detection. These features analyze the image and change brightness, color, sharpness, and contrast.
At first, the picture can look more detailed. Then, you may notice that skin tones change between scenes. Shadows can suddenly become brighter, and bright objects can look harsher.
The most common settings include:
- AI Picture
- AI Picture Pro
- Intelligent Mode
- Adaptive Picture
- Intelligent Scene
- AI Brightness
- Auto Genre Selection
- Scene Recognition
Turn these features off and watch the same scene again. In many cases, the picture becomes more stable.
My practical view is simple. Automatic picture processing can work for casual daytime television, but it often feels distracting during films. A good Cinema or Filmmaker preset usually gives a more consistent result.
Turn Off Aggressive Energy Saving
Energy-saving settings reduce electricity use. They can lower screen brightness, activate a room-light sensor, or switch the television off after a set period.
The automatic power-off timer is useful. Yet aggressive dimming can make HDR content look weak.
Check these menus when the picture looks too dark:
- Eco Mode
- Energy Saving
- Power Saving
- Brightness Optimisation
- Automatic Power Saving
- Energy Reduction
First, switch the setting off. Then, test a bright HDR scene and a dark scene. You may notice more detail in both.
Some televisions keep Eco Mode active across several picture presets. So, changing from Standard to Cinema may not remove it.
You can still reduce power use manually. Lower the panel brightness to a comfortable level instead of letting the TV change it throughout the day.
Disable the Ambient Light Sensor
The ambient light sensor measures the light in your room and adjusts the screen brightness.
This feature sounds useful. Yet it can create inconsistent results. Sunlight may change during the afternoon. Someone may switch on a lamp. A person may walk past the sensor. Then, the picture can become brighter or darker for no clear reason.
Brands use names such as:
- Light Sensor
- Auto Brightness
- Ambient Optimisation
- Adaptive Luminance
- Brightness Optimisation
Turn the sensor off when you want stable brightness. After that, create one picture preset for daytime and another for evening viewing.
Do not confuse this sensor with OLED panel protection. OLED dimming features protect the screen from static images. Those controls should stay active.
Lower Sharpness and Turn Off Edge Processing
The Sharpness control does not restore missing detail. Instead, it adds artificial borders around objects.
At first glance, a high Sharpness setting can look clearer. Yet close inspection often reveals glowing edges around text, faces, buildings, and game menus.
Start by lowering Sharpness close to zero. Still, some brands use the middle of the scale as the neutral point, so compare a familiar 4K scene before settling on a value.
Turn off related settings such as:
- Edge Enhancement
- Detail Enhancer
- Super Resolution
- Resolution Remaster
- Extra Sharpness
- High Reality Creation settings
Your TV still needs basic upscaling for lower-resolution content. So, do not worry about removing every form of image scaling. The goal is to stop heavy artificial sharpening.
Disable Noise Reduction for Clean Sources
Noise reduction can help old DVDs, weak broadcasts, and low-quality video streams. Yet it can remove fine detail from clean HD and 4K sources.
Skin may look waxy. Fabric can lose texture. Film grain may appear frozen or smeared.
Turn noise reduction off for:
- 4K Blu-ray
- Modern streaming services
- PlayStation consoles
- Xbox consoles
- Gaming PCs
- High-quality media files
- Good 1080p content
Next, leave a low setting available for poor cable channels or old recordings. In that case, the feature can make rough video easier to watch.
The key is simple. Use noise reduction as a repair tool, not as a permanent setting.
Turn Off Contrast Boosting
Contrast processing changes bright and dark parts of the picture from scene to scene. Brands may call it Contrast Enhancer, Advanced Contrast, Active Contrast, Black Enhancer, or similar names.
The picture can look more dramatic at first. Yet the TV may remove detail from clouds, snow, black clothing, and dark rooms.
For example, a dark jacket may turn into one flat black area. Bright clouds may become plain white patches.
Set contrast enhancement to Off for films, premium streaming content, and UHD discs. A Low setting can help in a very bright room, but High often looks harsh.
Do not confuse this option with the normal Contrast slider. The standard slider controls the white level. Contrast processing changes the picture continuously.
Turn Off Automatic Volume Levelling
Automatic volume controls try to keep adverts, dialogue, music, and action scenes at a similar loudness.
That sounds helpful, but the effect can make a film soundtrack feel flat. Explosions lose impact. Music becomes less powerful. Background sounds can rise and fall during conversations.
Look for settings such as:
- Auto Volume
- Volume Levelling
- Adaptive Sound
- AI Sound
- Dialogue Levelling
- Night Sound
Turn automatic volume leveling off for films and series, especially with a soundbar or AV receiver.
Next, use Night Mode during late viewing. It reduces loud peaks without changing the whole soundtrack as heavily.
Virtual surround can cause problems too. A television and soundbar may both process the same signal. Then, voices can sound distant, hollow, or strangely wide.
So, let one device handle the sound processing.
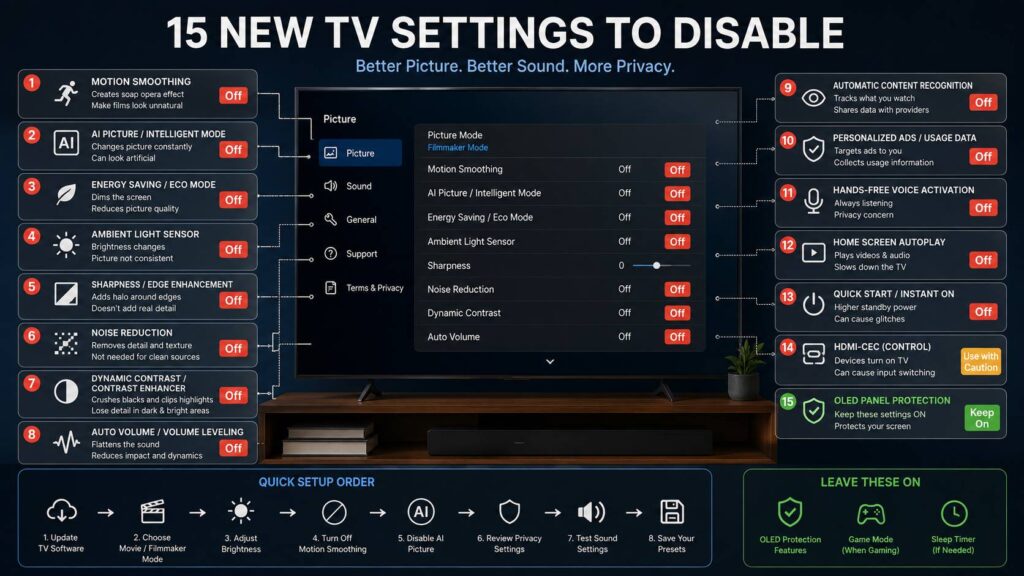
Disable Automatic Content Recognition
Automatic Content Recognition can identify what appears on your screen. It may collect information from streaming apps, antenna broadcasts, cable boxes, consoles, and other HDMI devices.
Manufacturers may place it under names such as:
- Viewing Information Services
- Smart TV Experience
- Viewing Data
- Live Plus
- Content Recognition
- Viewing History
- Interest-Based Advertising
Open the Privacy, Terms, Advertising, or Smart TV settings. Then, turn off viewing information collection when you do not want the television identifying your content.
This setting matters even when you use an external streaming device. The recognition system can work at the TV level, so it may still identify what appears through HDMI.
Turning it off should not block basic television viewing or app playback. Yet some recommendations may become less personal.
Turn Off Personalised Ads and Usage Data
Content recognition is only one part of smart TV tracking. So, check for separate controls covering ads, analytics, and app usage.
Look for:
- Personalized ads
- Interest-based advertising
- Advertising ID
- Device usage data
- App usage data
- Viewing data sharing
- Marketing consent
- Recommendation history
Turning these settings off does not always remove every advertisement from the home screen. Still, it can reduce personalization and limit some forms of data collection.
Your television is only one part of the connected setup. Phones and tablets often control casting, streaming apps, and account access. For another useful security check, read should you turn off Google Play Protect.
Review the privacy menu again after a factory reset or major software update. New consent options can appear, and older choices may move to a different menu.
Disable Hands-Free Voice Activation
Some televisions listen for a wake phrase without a remote button press. Common examples include Alexa, Google Assistant, Bixby, and hands-free Roku voice controls.
Turn this setting off when you only use voice search through the remote.
Look for:
- Hands-Free Voice
- Voice Wake-Up
- Always Ready
- Alexa Hands-Free
- Bixby Wake-Up
- Google Voice Detection
- Microphone in Standby
Some televisions include a physical microphone switch on the frame. Check the lower edge, side, or rear panel.
After you turn off hands-free listening, voice search through the remote may still work. Yet voice commands that power on the TV may stop working.
For most people, pressing a microphone button gives more control and avoids accidental wake-ups from conversations or television dialogue.
Turn Off Home-Screen Autoplay
Smart TV home screens often play video previews, promotional clips, or sounds as you move through menus.
At first, this may feel modern. After a few days, it can become annoying. It can slow the interface, start unwanted audio, and make the home screen feel crowded.
Search for:
- Autoplay Video
- Autoplay Audio
- Featured Content
- Promotional Notifications
- Recommendation Notifications
- Content Previews
Turn them off for a quieter home screen.
Google TV users can try Apps Only Mode. It removes many recommendations and places more focus on installed apps. Yet some voice and personalization features may become limited.
Roku users can switch off extra content prompts that appear over HDMI sources.
Disable Quick Start When Standby Creates Problems
Quick Start, Instant On, Fast Start, Network Standby, and Always Ready keep parts of the television active after shutdown.
The next startup is faster. Yet the TV never completes the same full restart that it gets from a proper shutdown.
Try turning Quick Start off when you notice:
- Frozen streaming apps
- Missing sound after startup
- Wi-Fi connection problems
- A soundbar that fails to connect
- Random input switching
- The TV waking from a mobile app
- HDMI devices failing after standby
The TV may take a few extra seconds to start. Still, that small delay can fix many repeated standby problems.
For example, an app that opens to a black screen may work normally after a full restart. Soundbar detection can improve too.
Disable HDMI Control Only When Devices Misbehave
HDMI control lets connected devices communicate with each other. A console can turn on the television. A streaming box can change the input. The TV remote can control a soundbar.
Brand names include:
- Samsung Anynet+
- LG SIMPLINK
- Sony BRAVIA Sync
- Philips EasyLink
- Panasonic VIERA Link
- HDMI Control
- CEC Control
This feature is useful, so do not switch it off without a reason.
Turn it off when devices change inputs by themselves, a console wakes the television, or a soundbar creates a power loop.
Next, test each connected device one at a time. Some TVs let you stop automatic power control without removing every HDMI control feature.
Keep it active when your soundbar relies on HDMI ARC or eARC. Turning it off can break volume control, automatic audio switching, or power syncing on some setups.
Keep OLED Panel Protection Active
OLED owners should not disable pixel protection features. These controls reduce image retention risk and protect the panel during long-term use.
Keep these settings active:
- Pixel Shift
- Screen Move
- Logo Brightness Reduction
- Static Logo Detection
- Screen Saver
- Automatic Panel Refresh
- Pixel Cleaning Reminders
- Screen Optimisation
You may notice the image move by a few pixels. Bright logos can become slightly dimmer. The television may run maintenance after shutdown.
These actions are normal.
Do not unplug an OLED television after every viewing session. Automatic panel care often runs after the screen turns off. Leave the television connected to power and switch it off with the remote.
Manual pixel cleaning should not become a daily task. Run it after an on-screen request or during troubleshooting.
Use This Setup Order for a New TV
Changing every control at once makes it hard to see what helped. So, work through the menus in a clear order.
- Update the television software.
- Select Cinema, Movie, Professional, or Filmmaker Mode.
- Turn off aggressive energy saving.
- Disable the ambient light sensor.
- Set brightness for the room.
- Turn off motion smoothing.
- Lower Sharpness.
- Disable noise reduction for clean sources.
- Turn off contrast enhancement.
- Activate Game Mode for consoles.
- Review advertising and viewing-data controls.
- Check voice and microphone settings.
- Test sound settings with your speakers.
- Save separate presets for daytime, evening, sports, and gaming.
Picture settings may be stored separately for each HDMI input, app, HDR format, and video mode. So, a change made during normal television viewing may not carry over to HDR10, Dolby Vision, gaming, or another HDMI port.
Test each main source with a familiar scene. First, check skin tones. Next, look at shadow detail, subtitles, camera movement, and bright highlights.
Then, make small changes.
A good picture should feel natural. It should not become brighter, darker, sharper, or smoother every few seconds. Once the main processing and privacy settings are under control, your television should feel calmer, faster, and much easier to enjoy.
Focus keyphrase: new TV settings to disable