To pair a Logitech mouse with multiple computers, give each computer its own Easy-Switch channel. The MX Master 3S and MX Master 4 mice and the MX Keys S and MX Keys Mini keyboards each hold three, so a work laptop, a home desktop and a tablet can share one keyboard and mouse. Setting up all three takes about 15 minutes. Use the three-second hold only on a free channel, because it erases whatever computer the channel held. By the end, each computer has the same channel number on both devices, and one keyboard key can move both.
Before you start
- The mouse and keyboard, charged and switched on
- Each computer within reach, with Bluetooth on or a free USB port for a receiver
- Logi Options+ on each Windows PC or Mac that will use a receiver or a one-key switch (Logitech makes the full app for those two systems only)
- A second Logi Bolt receiver if two computers will both use one, since each receiver stays in its own computer
Decide which computer gets which channel
Leave channel 1 for the receiver that came in the box. A new MX Master starts on channel 1, and Logitech’s setup guide for the MX Master 4 expects the mouse to connect as soon as that receiver goes into a USB port. Use channels 2 and 3 for the other computers.
Give a computer the same number on both devices. Keyboard key 2 and mouse light 2 then always mean the same machine, which you’ll want once the keyboard starts moving the mouse for you.
A receiver serves one computer, but one Logi Bolt receiver carries up to six Bolt devices, so the keyboard and mouse can share it. If you bought an MX Keys S and an MX Master separately, each box held a Bolt receiver. That is one receiver for each of two computers, and the third connects over Bluetooth.
Put the receiver on any computer that needs the mouse before Windows or macOS loads. Logitech says a Bolt receiver works in BIOS settings and a Bluetooth connection doesn’t. On an Intel Mac with FileVault turned on, Bluetooth mice and keyboards reconnect only after you log in. The receiver avoids that.
Check the logo on the bottom of each device before you buy a spare. Logi Bolt devices pair only with Bolt receivers, and older Unifying devices such as the M720 Triathlon pair only with Unifying receivers. The MX Master 4 ships with a USB-C Bolt receiver. The mouse also works with the USB-A Bolt receiver, which suits a desktop with no USB-C port.
Pair the mouse with each computer
These steps add a computer on channel 2. Repeat them on channel 3 for the next one.
- Turn the mouse over and short-press the Easy-Switch button until the channel 2 light comes on.
- Hold the button for three seconds, until that light blinks fast. This clears whatever the channel held before.
- Open the computer’s Bluetooth settings and pick the mouse from the list.
- Wait for the light to stop blinking. It glows steadily for about five seconds, then turns off to save power.
- Short-press the button until channel 1 lights up, and check that the first computer still answers.
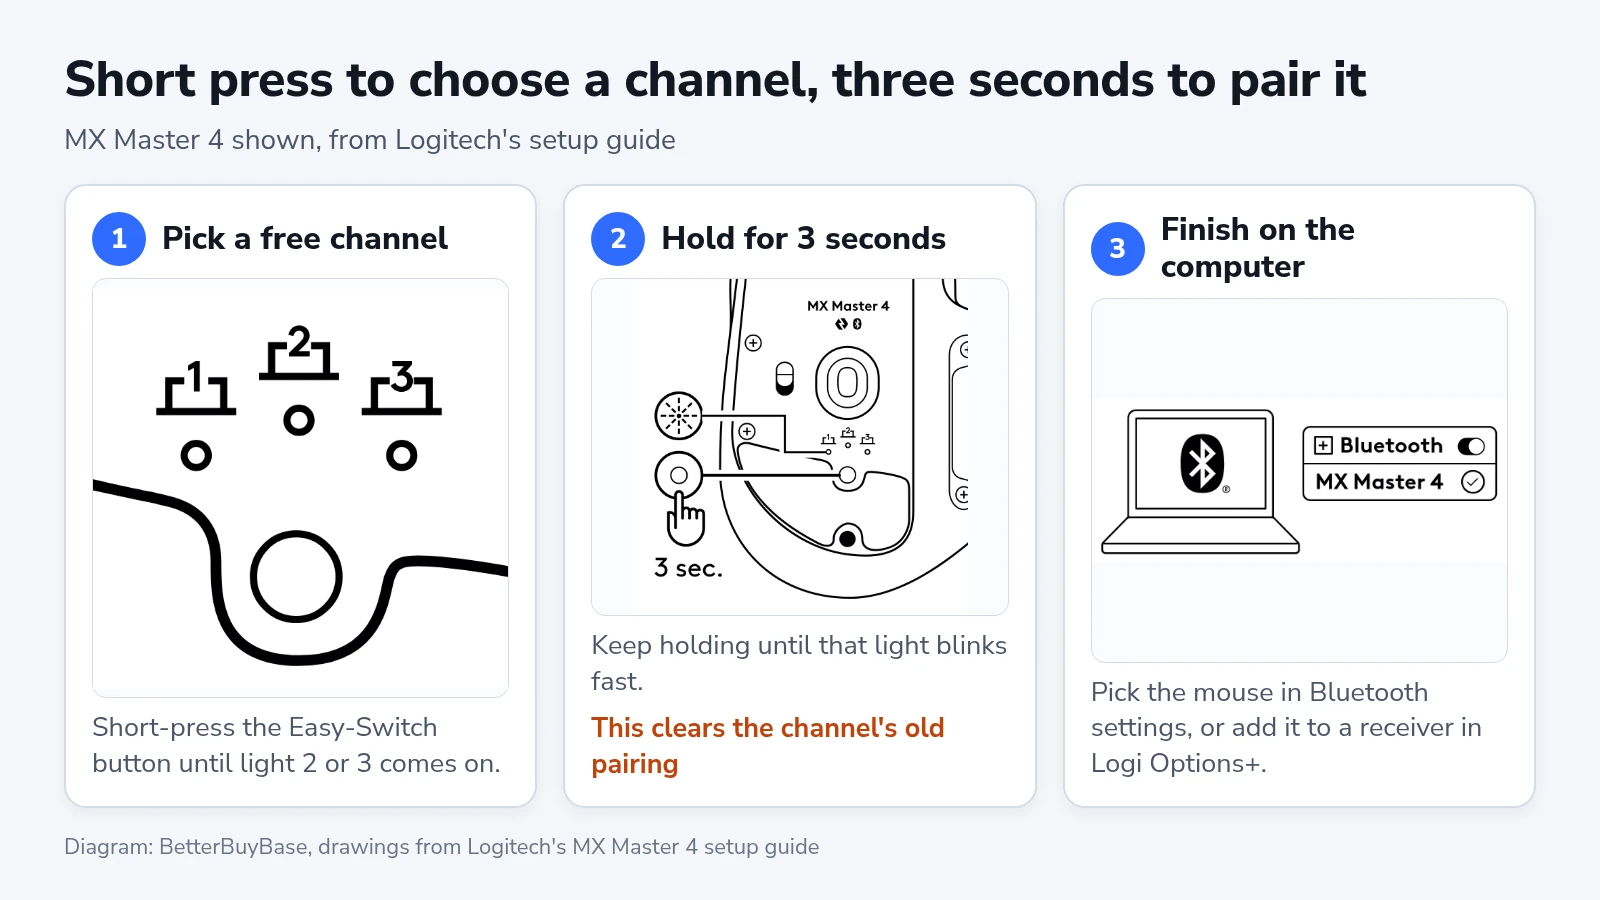
On Windows 11, a Swift Pair notice may pop up with a “Connect” button. If it doesn’t, select the network, sound or battery icon next to the clock, open “Manage Bluetooth devices” on the Bluetooth tile and pick the mouse under “New devices”. On a Mac, choose Apple menu > “System Settings” > “Bluetooth”, hold the pointer over the mouse and click “Connect”.
To put a channel on a second Bolt receiver instead, plug that receiver into the computer and open Logi Options+. Click “Add device” and choose “Logi Bolt receiver”, then hold the Easy-Switch button for three seconds. Click “Connect” next to the mouse’s name and follow the on-screen button sequence that verifies the mouse.
Pair the keyboard the same way
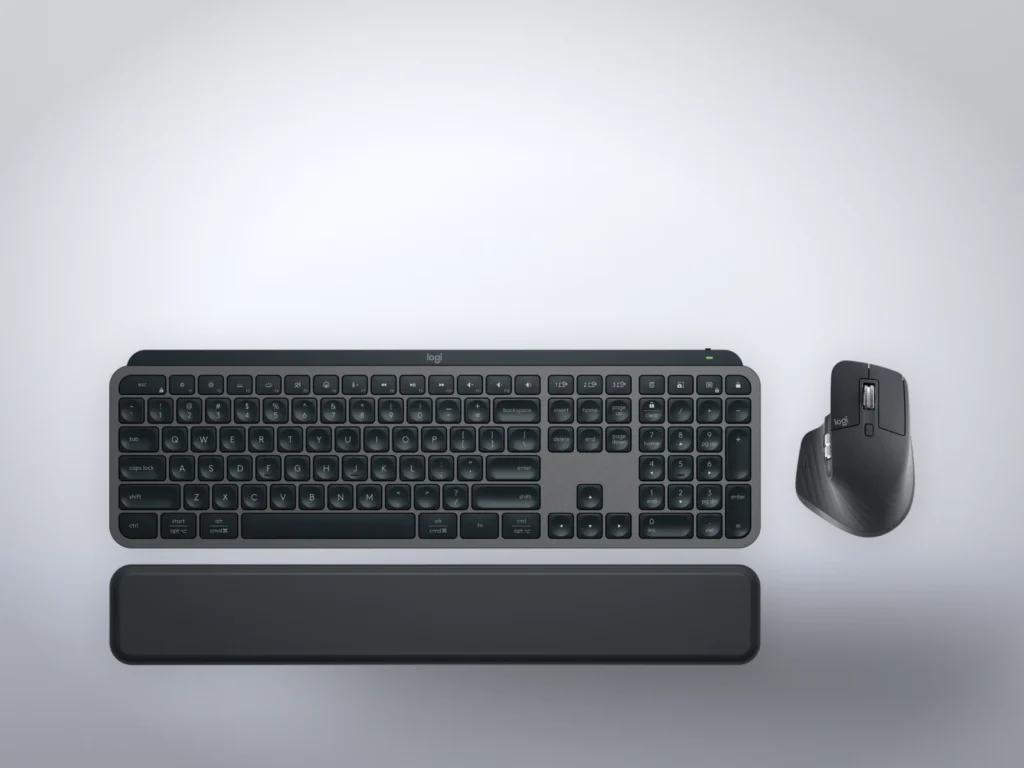
The MX Keys S has three numbered Easy-Switch keys above Insert, Home and Page Up. The MX Keys Mini puts them on F1, F2 and F3.
- Press the Easy-Switch key with the number you gave this computer on the mouse.
- Hold that key for three seconds, until its light blinks fast.
- Pick the keyboard in the computer’s Bluetooth settings.
- Type the numbers the computer shows, on the Logitech keyboard, and press Enter (Return on a Mac).
A Bolt receiver asks for the same kind of code through Options+. If the Mini’s top keys type F1 to F3 instead of switching, press Fn and Esc together to swap the top row back.
Switch both devices with one key
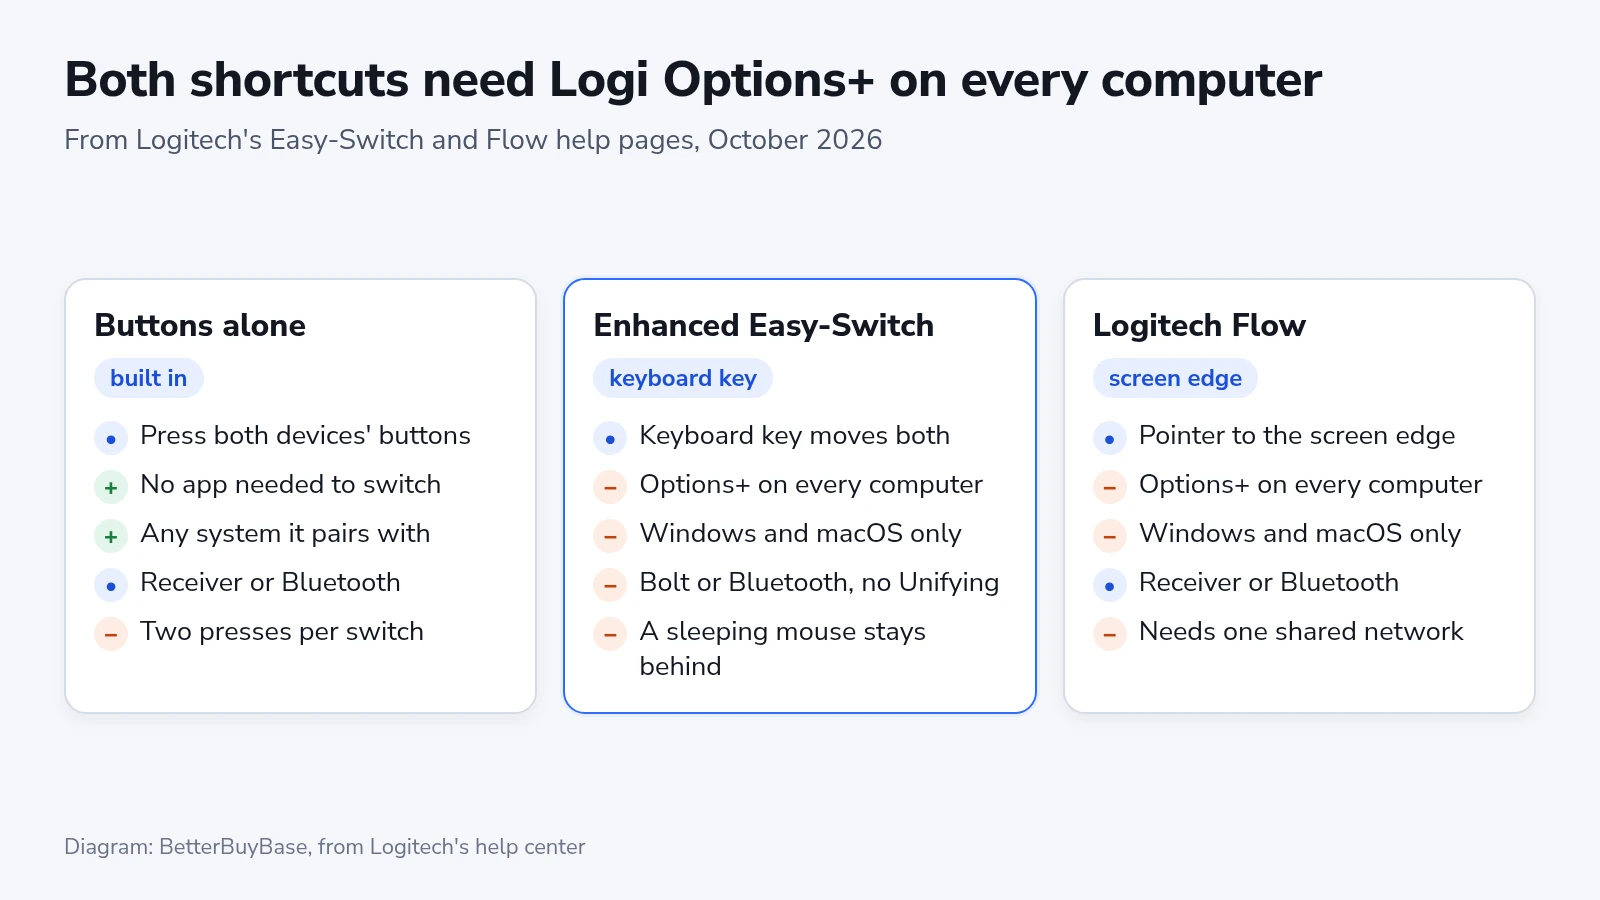
Since Logi Options+ 2.3 arrived in April 2026, a supported keyboard can take the mouse with it when you press an Easy-Switch key. Logitech calls this Enhanced Easy-Switch. Both devices have to connect by Bolt receiver or Bluetooth, and every computer needs Options+ running on Windows or macOS. Unifying devices are left out, even when they connect over Bluetooth.
- Pair the keyboard and the mouse with every computer first.
- Open Logi Options+ on any one of them and select the keyboard.
- Open the “Easy-Switch” tab. If it’s missing, open the “Connectivity” tab and click the “Easy-Switch” panel.
- Click “Configure”.
- Under “Link compatible devices”, turn on the switch next to the mouse.
The devices store the link, so one setup covers every computer the pair already knows and any you add later. The keyboard needs its latest firmware, and Options+ prompts you when an update is due.
Logitech’s feature guide, updated October 22, 2026, lists only the MX Keys S and MX Keys Mini keyboards. The Options+ release notes go further. Version 2.5 in July added the MX Mechanical keyboards and the Signature Slim Solar+ K980, and version 2.6 added the Alto Keys K75M and the Signature Mechanical K868. Any mouse that works with Bolt and Easy-Switch in Options+ can follow, and both MX Master mice meet that rule.
Only the keyboard’s keys move both devices. The mouse’s own button moves just the mouse, and a mouse in deep sleep stays on the old computer. Pressing the keys in quick succession can leave it behind too. Short-press its Easy-Switch button until it reaches the keyboard’s computer. On an iPad or a PC without Options+, plan to move the mouse with its own button as well.
Logitech Flow moves both devices when the pointer reaches the edge of the screen. Install Options+ and turn on Flow on each computer, and keep them all on the same network. The first connection also needs the internet. Flow copies text, images and files from one computer to another. Turn on “Hold Ctrl and move to the edge” if the pointer keeps crossing over by accident. Flow accepts a mouse on a Unifying receiver, so an M720 Triathlon can use it.
The MX Master 4 adds a third way. In Options+, click the Actions Ring icon and then “Customize Ring”, drag the “Easy-Switch” card from “System Actions” onto a bubble, and choose the computer under “Channel”. Pick “Easy-Switch 2 Devices” instead if you want a click on that bubble to move the keyboard too.
Other Logitech models
| Model | Where the switch is | Receiver in the box |
|---|---|---|
| MX Master 3S | Button under the mouse | Logi Bolt |
| MX Master 4 | Button under the mouse | Logi Bolt, USB-C |
| Pebble Mouse 2 M350s | Connect button under the mouse | None |
| MX Keys S | Keys 1 to 3 above Insert | Logi Bolt |
| MX Keys Mini | F1 to F3 | None |
| Alto Keys K98M | F1 to F3 | Logi Bolt |
A one-second press steps the Pebble Mouse 2 M350s through its channels, and a three-second hold starts pairing if the light isn’t already blinking. On Bluetooth, the Alto Keys K98M asks for the same code as the MX keyboards, but neither of Logitech’s lists for the one-key switch names it yet. An M720 Triathlon has three channels too, each on its Unifying receiver or Bluetooth.
When a channel won’t connect
If the light blinks fast but the computer doesn’t list the mouse, check for Bluetooth Low Energy, which Windows 7 can’t use. Turn Bluetooth off and on, delete any old entry for the mouse from the list, and pair again.
A slow blink after you switch means the channel isn’t paired. On a receiver channel, make sure the receiver is plugged into the computer in front of you. Otherwise pair that channel again.
A Mac that loses the mouse after several quick presses of the Easy-Switch button may have lost the pairing. Pair it again in the Bluetooth settings.
If the mouse stops working after a Windows PC wakes, open Device Manager and the Bluetooth adapter’s properties. On the “Power Management” tab, clear “Allow the computer to turn off this device to save power” and restart.
When Options+ can’t pair a receiver, plug it straight into the computer, away from hubs, extenders and front-panel ports. If a USB 3.0 port fails, try a USB 2.0 port.
If the mouse is missing from the Enhanced Easy-Switch list, check that it is switched on, paired with this computer and connected by Bolt or Bluetooth. Restart Options+ if the mouse was asleep when you opened the page.
Check that every channel works
Press each Easy-Switch key in turn and type a few letters into a text box on each computer. Then move the pointer on each one, after switching the mouse with its own button, or with no extra press if you linked it to the keyboard. Options+ shows each device with its connection type and battery level.
Run the same check after you replace a computer or reinstall its system. The old pairing then points at a machine that is gone, which is the one time you want the three-second hold to clear a channel. Removing the mouse from a computer’s Bluetooth list also unlinks it from the keyboard without a warning, so turn the link back on afterward. Options+ backups don’t include channel settings, because the devices store them.