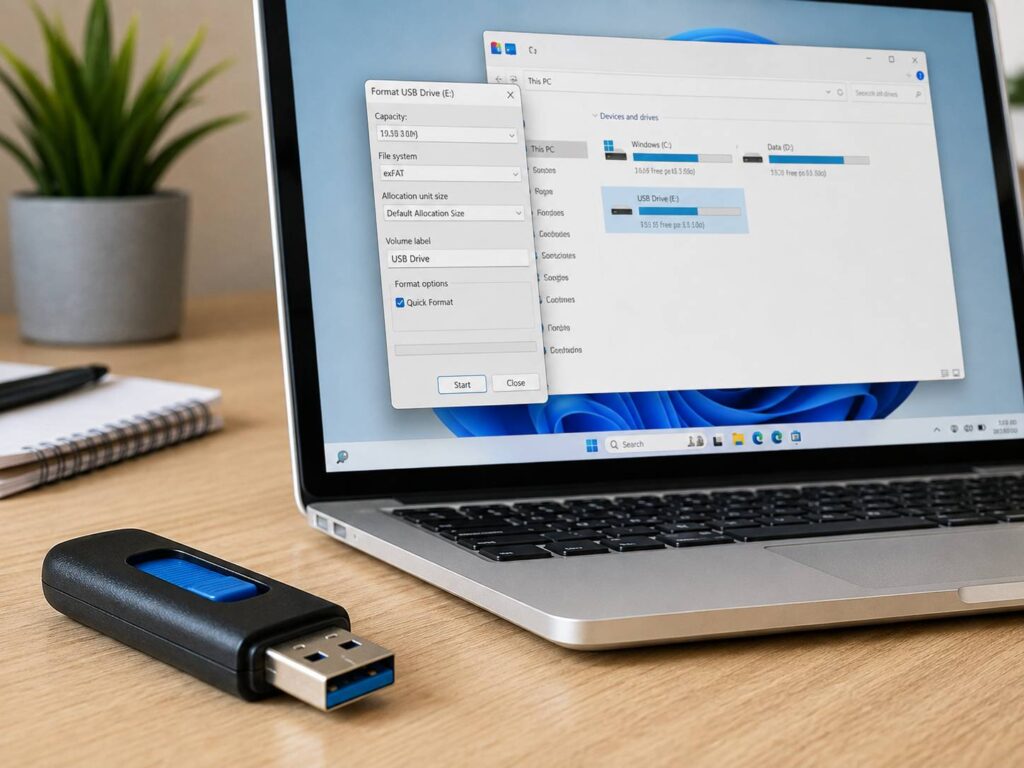
Formatting a USB drive on Windows 11 is usually easy. You plug in the drive, open File Explorer, choose a file system, and start the format. Still, the file system you pick decides which devices can read the drive.
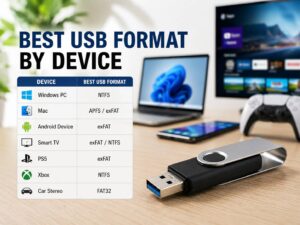
For example, a USB drive used only with Windows PCs has different needs from one that moves files between Windows and a Mac. A flash drive connected to a TV, car stereo, game console, camera, printer, or router can have its own requirements too.
So, before clicking Format, it helps to know what FAT32, exFAT, and NTFS actually mean for everyday use.
This guide explains how to format a USB drive on Windows 11, how to choose the right file system, what Quick Format does, and how to fix common USB formatting problems. You will also learn how to restore missing storage capacity and format stubborn drives with Disk Management or DiskPart.
Before you start, copy any files you want to keep somewhere safe. Formatting removes the files stored on the selected volume.
Choose the Right File System Before Formatting
Windows supports several file systems, but most USB flash drive users will choose between FAT32, exFAT, and NTFS.
Each one has strengths and drawbacks. So, the best choice comes down to where you plan to use the drive.
exFAT
For most modern USB flash drives, exFAT is a very practical choice. It supports files larger than 4 GB and works well for videos, backups, disk images, and large archives.
It is also a good choice for people who regularly move files between Windows and macOS computers.
Choose exFAT if:
- You move files between Windows and macOS.
- You store individual files larger than 4 GB.
- You want broad support across newer devices.
- You mainly use the USB drive for portable storage.
- You store large videos or backup files.
Still, device support varies. Some older TVs, car stereos, cameras, and media players cannot read exFAT.
For that reason, check the manual for the device before formatting a USB drive that will stay connected to dedicated hardware.
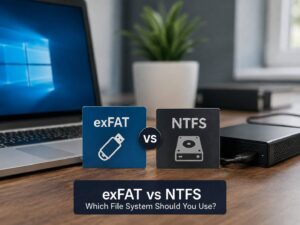
If you are unsure which of the two newer Windows-friendly formats fits your needs, this exFAT vs NTFS comparison explains their differences in more detail.
FAT32
FAT32 is much older, but it remains useful. In fact, some older electronics still expect a USB drive to use FAT32.
The biggest drawback is the file size limit. A single FAT32 file cannot exceed 4 GB.
So, FAT32 can become frustrating if you work with large videos, game files, backups, or disk images.
Choose FAT32 if:
- Your device manual asks for FAT32.
- You need compatibility with older equipment.
- You are creating certain boot or recovery drives.
- You will not store files larger than 4 GB.
You may run into another issue with larger USB drives. Windows does not always offer FAT32 in the standard Format window for large volumes.
That does not automatically mean anything is wrong with the drive. Instead, Windows often expects those larger volumes to use exFAT or NTFS.
NTFS
NTFS is the main file system used by modern Windows installations. It supports large files and includes Windows features such as file permissions, journaling, and compression.
For a USB drive that stays inside a Windows setup, NTFS can work very well.
Choose NTFS if:
- The drive will mainly connect to Windows PCs.
- You regularly store large files.
- You need NTFS permissions or other Windows features.
- Compatibility with older devices is not a priority.
For normal portable storage, I usually prefer exFAT. It is simpler when a flash drive needs to move between several devices.
NTFS makes more sense for Windows-focused storage. FAT32 is still useful too, mainly for older hardware and devices that require it.
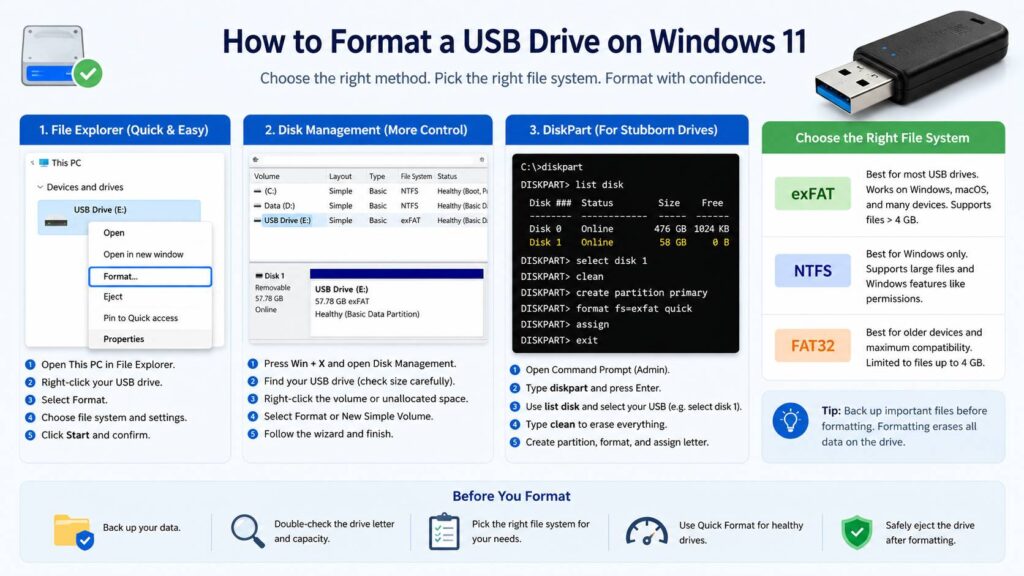
How to Format a USB Drive Using File Explorer
File Explorer is the easiest way to format a healthy USB drive that already appears correctly in Windows.
Start by connecting the flash drive to your PC.
Then:
- Open File Explorer.
- Select This PC.
- Find the USB drive under Devices and drives.
- Check its drive letter and storage capacity.
- Right-click the USB drive.
- Select Format.
- Choose FAT32, exFAT, or NTFS.
- Leave Allocation unit size at its default value for normal use.
- Enter a Volume label if you want to rename the drive.
- Choose whether to keep Quick Format enabled.
- Click Start.
- Read the warning carefully.
- Confirm that you selected the correct USB drive.
- Start the format.
Windows should finish the process fairly quickly when Quick Format is enabled.
After that, open the drive and copy a small test file onto it. Then eject the drive, reconnect it, and open the file again.
This simple test is useful. For example, it can expose a failing USB drive, unstable port, or compatibility issue before you trust the drive with important files.
Quick Format vs Full Format
Windows normally gives you the choice between Quick Format and a full format.
For most everyday situations, Quick Format is the better option.
Quick Format prepares the file system without running the longer full-format process across the drive. As a result, it usually finishes much faster.
Use Quick Format if:
- The flash drive works normally.
- You are changing the file system.
- You want to empty the drive for reuse.
- You have no reason to suspect storage errors.
A full format takes far longer. Still, it can make sense when a USB drive has behaved strangely.
Use a full format if:
- The drive has produced read or write errors.
- Files have become corrupted several times.
- Windows has reported storage problems.
- You want Windows to perform the longer formatting process.
For routine use, there is little reason to run a full format every time.
Flash storage also has a finite number of write cycles. So, repeatedly performing long full formats without a clear reason is unnecessary.
What Allocation Unit Size Should You Choose?
Windows may ask you to choose an allocation unit size during formatting.
For most people, the answer is simple. Leave it at Default allocation size.
The allocation unit size controls how storage space is divided into blocks. Different settings can suit different workloads, but the gains are usually small for a normal USB flash drive.
For example, a drive filled mainly with very large media files can work with larger clusters. A drive holding huge numbers of tiny files has different needs.
Still, changing this setting by hand rarely gains anything useful.
So, my usual recommendation is to choose the right file system and leave the allocation size alone.
How to Format a USB Drive Using Disk Management
Sometimes a flash drive appears in Windows but does not behave correctly in File Explorer.
In that case, Disk Management is the next tool to try.
It can help with:
- Missing drive letters
- Unallocated storage
- Old partitions
- Incorrect volume layouts
- Drives previously used as bootable media
- USB drives showing the wrong capacity
To open Disk Management, right-click the Start button and select Disk Management.
You can also press Windows + R, type:
diskmgmt.msc
Then press Enter.
Next, locate the USB drive.
Take care here. Disk Management displays your internal SSDs, hard drives, external drives, memory cards, and USB sticks in the same place.
For this reason, compare the drive capacity before changing anything.
If the USB drive already contains a normal volume:
- Right-click the USB volume.
- Select Format.
- Enter a volume label.
- Select the file system.
- Keep the default allocation unit size.
- Select Quick Format for normal use.
- Confirm the format.
If the drive instead shows Unallocated space, right-click that area.
Then choose New Simple Volume and follow the wizard.
Windows will guide you through assigning a drive letter, selecting a file system, and formatting the new volume.
This method is especially useful after using a flash drive for Windows installation media, Linux installation media, or recovery tools. Those tools can create partitions that make the USB drive look unusual in File Explorer.
How to Restore the Full Capacity of a USB Drive
A 128 GB USB drive can sometimes appear as 32 GB, 16 GB, or another much smaller size.
This often happens after the drive has been turned into bootable or recovery media.
For example, a tool may create a small boot partition and leave the rest of the capacity in another partition or as unallocated space.
To fix it, open Disk Management and locate the USB drive.
Next, inspect its partitions.
If several old partitions remain on the USB drive, you can remove them and create one new volume using the full available capacity.
Be careful. Deleting a partition removes the data stored inside it.
Once the drive shows one large block of unallocated space, right-click it and choose New Simple Volume.
Then use the full available size, assign a drive letter, and format it with your preferred file system.
In many cases, this restores the USB drive to its expected usable capacity.
How to Format a USB Drive Using DiskPart
DiskPart is another Windows storage tool. Unlike File Explorer, it works through commands.
It can fix flash drives with broken partition layouts or old boot partitions that Disk Management struggles to remove.
Still, DiskPart requires extra care. Selecting the wrong disk can erase another storage device.
Start by opening Windows Terminal or Command Prompt with administrator rights.
Then enter:
diskpart
Next, type:
list disk
DiskPart will display the storage drives connected to the computer.
Identify the USB drive by its capacity.
Then enter:
select disk X
Replace X with the correct disk number.
Next, enter:
clean
Then:
create partition primary
For exFAT:
format fs=exfat quick
For NTFS:
format fs=ntfs quick
After formatting, enter:
assign
Then finish with:
exit
The clean command removes the partition information from the selected disk.
So, check the disk number twice before running it.
File Explorer or Disk Management is the safer choice. I would keep DiskPart for broken partition layouts, failed bootable USB setups, and drives that normal Windows tools cannot repair.
What to Do if Windows Cannot Format the USB Drive
Sometimes Windows displays an error such as Windows was unable to complete the format.
This message does not point to one exact problem. So, start with the simple fixes before using command-line tools.
Try these steps:
- Disconnect the USB drive and reconnect it.
- Try another USB port.
- Connect the drive directly to the PC instead of a USB hub.
- Restart Windows.
- Close apps that may have files open on the USB drive.
- Open Disk Management and check whether the drive appears there.
- Try formatting through Disk Management.
- Check for a physical write-protection switch.
- Test the flash drive on another computer.
- Try DiskPart after the easier options fail.
If a USB drive keeps disconnecting, becomes read-only, corrupts files, or fails formatting on several PCs, its flash memory or controller may be failing.
At that point, I would no longer trust it with important data.
A successful format alone does not prove that an unreliable flash drive has become safe again.
Why Is My USB Drive Write-Protected?
Some removable storage devices include a physical write-protection switch.
SD cards and SD card adapters are common examples.
If the switch is locked, move it to the unlocked position and reconnect the device.
A drive can also become read-only through software settings or storage errors.
In some cases, a failing USB controller can place the flash storage into a permanent read-only state. This can happen when the device can still read existing data but no longer trusts itself to write new data reliably.
So, a flash drive that suddenly becomes permanently read-only deserves caution.
Copy off any important files that remain accessible and replace the drive if the problem keeps returning.
Why Does the USB Drive Not Appear in File Explorer?
A USB drive can be detected by Windows without appearing under This PC.
Disk Management can help you find the reason.
Common causes include:
- The drive has no assigned letter.
- The storage space is unallocated.
- The partition uses an unsupported file system.
- The drive contains an unusual partition layout.
- The storage device is offline.
- The USB drive has failed.
If the volume looks healthy but has no letter, right-click it and assign a drive letter.
Then reopen File Explorer.
If the drive does not appear in Disk Management either, try another USB port.
Next, test it on a different PC.
If neither computer detects it, the problem is more likely related to the USB drive itself.
Can You Format a USB Drive Without Losing Data?
You should treat formatting as a data-erasing process.
So, copy anything important to another storage device first.
There are situations where Windows can convert one file system without performing a normal format. For example, certain FAT or FAT32 volumes can be converted to NTFS.
Still, that is a conversion process, not standard formatting.
For a normal USB flash drive, I prefer the safer route.
Copy the files somewhere else, format the drive properly, check that it works, and then copy your files back.
That process is easy to understand and easier to verify.
Can You Recover Files After Formatting a USB Drive?
Sometimes.
Recovery success varies based on the type of format, the flash drive, and what happened after formatting.
If you accidentally format the wrong USB drive, stop using it immediately.
Do not copy anything new onto it.
New files can overwrite storage areas that still contain recoverable pieces of the old data.
Then, use a trusted data recovery tool or Windows recovery options to scan the device.
Still, no recovery program can promise that every file will return intact.
For this reason, a backup is far safer than relying on file recovery after something goes wrong.
Best USB Format for a TV, Car, Console, or Camera
A file system that works perfectly on a Windows PC may fail on another device.
So, check the device documentation before formatting a USB drive for a TV, car stereo, camera, console, printer, router, or other dedicated hardware.
For example, an older TV may support FAT32 but reject exFAT. A newer television may read exFAT without a problem. Some devices accept NTFS too, but support varies widely.
FAT32 offers strong compatibility with older hardware, but the 4 GB file limit can be frustrating for modern video files.
exFAT is often a better match for large media files on newer devices.
NTFS works well with Windows, but it is less predictable on non-Windows hardware.
Firmware updates deserve extra attention.
If a manufacturer tells you to use FAT32, use FAT32. Do not assume exFAT or NTFS will work just because Windows can read them.
Common USB Formatting Mistakes to Avoid
Most formatting problems come from choosing the wrong drive or the wrong file system.
So, take a few seconds to check your settings before starting.
Common mistakes include:
- Formatting the wrong drive letter.
- Forgetting to back up important files.
- Choosing FAT32 and then trying to copy a file larger than 4 GB.
- Choosing NTFS for hardware that only accepts FAT32 or exFAT.
- Deleting the wrong partition in Disk Management.
- Running DiskPart
cleanon the wrong disk. - Trusting a USB drive that keeps corrupting files after formatting.
- Assuming the advertised capacity of a suspicious flash drive is genuine.
- Removing the drive during formatting.
- Ignoring repeated write errors.
One simple habit prevents many problems.
Check the drive letter, capacity, and volume name before you click Format.
Then check them one more time before confirming.
Which USB Format Should Most Windows Users Choose?
For a modern USB flash drive used for everyday file transfers, exFAT is my usual pick.
It supports large files, works well on Windows and macOS, and is accepted by many newer devices.
NTFS is a strong option for drives that stay mainly inside a Windows setup.
FAT32 remains useful for older hardware, some boot tools, recovery media, and devices that explicitly require it.
So, there is no need to choose the most advanced file system simply for the sake of it.
Choose the file system that works with every device that needs access to the drive.
Final Checklist Before Formatting Your USB Drive
Before you click Start, check these points:
- Back up any files you need.
- Confirm that you selected the correct USB drive.
- Check the drive letter and storage capacity.
- Decide which devices will use the drive.
- Choose FAT32, exFAT, or NTFS for that use.
- Leave allocation unit size at its default setting for normal storage.
- Use Quick Format for a healthy flash drive.
- Confirm that you no longer need the existing data.
- Keep the drive connected until formatting finishes.
Once those points are covered, formatting a USB drive on Windows 11 is usually quick and straightforward.
For most people, File Explorer is all that is needed. Disk Management is useful when partitions or drive letters cause trouble. DiskPart should stay reserved for more stubborn cases.
Most of all, choose the file system before you format, not after. That small decision can save you from file-size errors, unsupported drives, and another format later.