Mechanical keyboard switches look simple at first. Red, brown, blue, silent, speed, creamy, thocky, heavy, light. Then you open a store page and see dozens of options that sound almost the same.
That is where money gets wasted. Many people buy switches based on hype, a short video, or one loud comment from a keyboard forum. The set arrives, the board gets rebuilt, and the feel still seems wrong.
A better switch choice starts with your daily use. Then you look at feel, weight, sound, keyboard support, and budget. This guide explains how to pick keyboard switches for typing, gaming, office work, and mixed use without paying for switches that sit unused in a drawer.
Start With What You Actually Do Every Day
Your switch choice should start with your use case, not the switch color.
For office typing, a quiet tactile switch or a silent linear switch makes the most sense. You get a clean key press, but your keyboard will not annoy everyone nearby. For gaming, a smooth linear switch often feels better, as repeated taps feel easier and faster. For mixed use, a medium tactile switch gives many people a balanced feel.
Long writing sessions need comfort. Very heavy switches can feel premium for a few minutes, but they can tire your fingers across a full workday. Fast games need control too. Ultra-light switches can feel quick, but they can create accidental presses.
Clicky switches feel fun. They give clear feedback and a sharp sound. Still, they fit private rooms better than shared offices, calls, bedrooms, or late-night setups.
New buyers should keep the first choice simple. Pick a switch that matches the room and the task. Then chase sound and special features later.
Learn the Three Main Switch Types
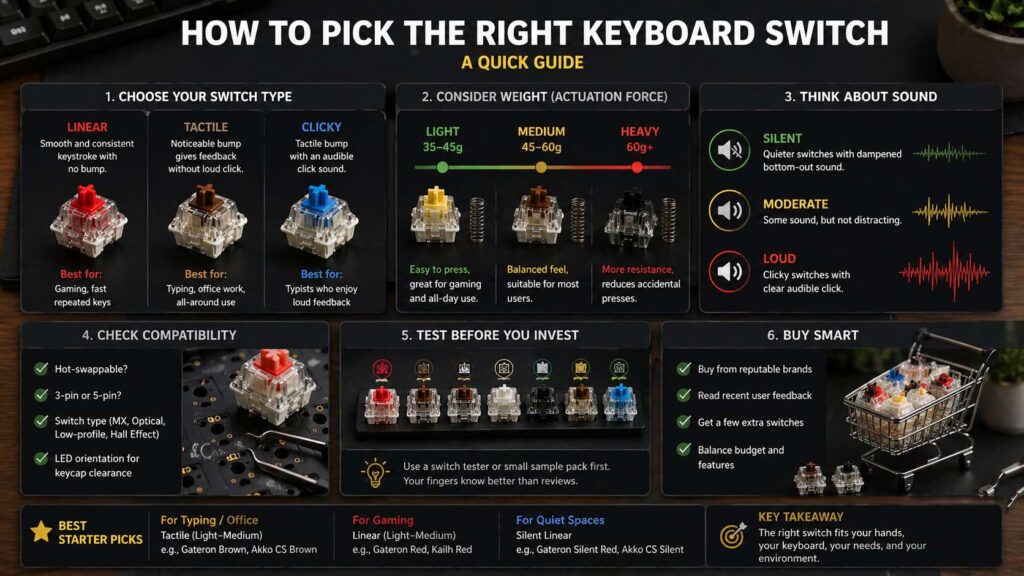
Most mechanical keyboard switches fall into three basic groups: linear, tactile, and clicky.
Linear switches move straight down with no bump. The press feels smooth from top to bottom. Gamers often like linear switches for movement keys, repeated taps, and fast inputs. Red, black, yellow, and silver switches often sit in this group, but brand names vary.
Tactile switches have a bump during the press. That bump tells your finger the key has registered. Many writers, coders, students, and office users prefer tactile switches. Brown, clear, panda-style, and many custom tactile switches fit this category.
Clicky switches give you a tactile bump and a clear click. Blue, green, jade, and navy switches often fall here. They feel lively, but they make the most noise.
If you are still deciding whether a full mechanical setup makes sense, read this guide on whether you really need a mechanical keyboard. It helps you decide before spending money on switches, keycaps, and tools.
Do Not Pick Switches by Color Alone
Switch color helps, but it does not tell the full story.
A red switch often means linear. A brown switch often means tactile. A blue switch often means clicky. Still, every brand has its own feel, spring weight, housing material, and factory lube.
Two red switches can feel completely different. One can feel light and fast. Another can feel smooth but firm. A third can feel quiet and soft at the bottom. They all share the same broad label, but they do not type the same.
Look at the switch type first. Then check actuation force, bottom-out force, total travel, sound profile, pin style, and factory lube. Those details matter more than the color name.
Store descriptions can help, but they often use soft marketing words. Your fingers need real information. Use specs as a filter, then test before buying a full set.
Understand Switch Weight Without Overthinking It
Switch weight tells you how much pressure a key needs. Brands often list this as grams, gf, or cN. You do not need to memorize every number. You only need a practical range.
Light switches often sit around 35 to 45 grams. They feel easy to press and work well for fast gaming. Still, they can cause accidental key presses for some users.
Medium switches often sit around 50 to 60 grams. This range works well for most people. It feels steady for typing, gaming, and daily work.
Heavy switches often sit around 65 grams and above. They resist accidental presses, but they can tire your hands faster. Buy heavy switches only after you already know that you like a firm feel.
Actuation force is only one part of the story. Bottom-out force matters too. You feel the full press, not just the point where the key registers. A switch can actuate early but still feel heavy at the bottom.
Take Sound Seriously Before You Buy
Sound matters more than many buyers expect.
A switch does not create the final keyboard sound by itself. The case, plate, foam, desk mat, keycaps, stabilizers, and your typing style all change the result. A switch that sounds deep in a metal custom board can sound thin in a budget plastic board.
Videos help, but they do not tell the whole story. Microphones, desk surfaces, and room echo change the sound. Use sound tests as a rough guide, not as proof.
For a shared room, pick silent switches first. Silent switches use small dampening parts to reduce impact noise. They do not make a keyboard truly silent, but they cut the sharp tap that bothers people nearby.
Silent switches feel different from normal switches. Many feel softer at the bottom. Some users love that cushioned feel. Others prefer a sharper press. For office work, shared homes, or late-night typing, that trade makes sense.
Buy a Switch Tester Before a Full Set
A switch tester costs less than a full switch set. It gives your fingers a quick way to compare linear, tactile, clicky, silent, light, medium, and heavy switches.
A tester does not copy the exact feel of a full keyboard. The keyboard plate, case, and keycaps still change sound and feel. Even so, a tester can stop the worst mistake: buying 90 switches that you dislike after one evening.
Pick a tester with a useful mix. Include at least one light linear, one medium linear, one light tactile, one medium tactile, one clicky switch, one silent linear, and one heavy tactile.
Do not tap each switch once and decide. Press each one for a few minutes. Type fake words. Try repeated taps. Hold down a key as you would in a game. Your fingers will tell you more than a product page.
Check Keyboard Support Before Spending Money
Compatibility saves money.
Start with the keyboard itself. A hot-swappable keyboard lets you remove and install switches without soldering. A soldered keyboard needs soldering tools and more skill.
Next, check the switch type. Standard MX-style switches do not fit every board. Optical keyboards need optical switches. Low-profile keyboards need low-profile switches. Hall Effect keyboards need compatible magnetic switches and a board built for them.
Pin support matters too. Many switches use 5 pins. Some keyboards only accept 3-pin switches. You can clip plastic legs from a 5-pin switch, but that adds work and can hurt resale value.
LED direction can matter for keycaps. Some north-facing LED boards can cause interference with certain Cherry-profile keycaps. This problem does not affect every setup, but it can matter if you plan to change keycaps later.
Check these details before checkout. Wrong switches turn a fun upgrade into a return request.
Skip Hype Words and Pay for Real Features
Switch listings often use words like creamy, thocky, poppy, clacky, silky, and deep. These words describe taste. They do not promise a good result in your keyboard.
Pay for clear features instead. Look for clean factory lube, stable stems, low spring ping, tight housings, smooth travel, correct pin support, and a sound profile that matches your room.
Factory-lubed switches can save time. A good factory-lubed switch feels smoother than many dry budget switches. Bad factory lube can feel uneven, so recent buyer feedback matters.
Limited-run switches often cost more. That higher price does not prove better quality. Many regular switches from known brands work well for daily typing and gaming.
A smart buyer sets a budget first. Then the switch has to earn the price through feel, sound, and fit.
Buy the Right Number of Switches
Do not buy a full-size pack for a compact keyboard. Do not buy the exact number either. Get a small buffer.
A 60% keyboard usually needs about 61 switches. A 65% keyboard often needs about 67 or 68 switches. A 75% keyboard often needs about 80 to 84 switches. A TKL keyboard usually needs about 87 switches. A full-size keyboard often needs about 104 to 108 switches.
Buy 5 to 10 extras. Bent pins happen. One switch can feel odd. A spare switch helps later repairs.
For a 75% keyboard with 82 keys, buy at least 90 switches. For a full-size keyboard, buy 110 switches. The extra cost is small compared with paying shipping twice.
Best First Switch Picks for Most People
Most first-time buyers should choose a safe middle option.
For typing and office work, start with a light or medium tactile switch. You get feedback without the sharp noise of a clicky switch.
For gaming, start with a light or medium linear switch. A 45 to 60 gram range gives speed without extreme sensitivity.
For quiet spaces, choose silent linear switches. Silent tactiles can work too, but some feel softer and less crisp.
For mixed use, a medium tactile switch is the safest bet. It works for writing, casual gaming, browsing, email, and general home use.
Clicky switches should come later. Buy them only after you know that the sound will not bother you or anyone around you.
Speed Switches and Hall Effect Switches
Speed switches use shorter travel or faster actuation. They can help with quick inputs in games, but they can hurt typing accuracy. Many users press keys by habit, and shorter actuation can register presses earlier than expected.
Hall Effect switches work in a different way. They use magnets and sensors rather than standard metal contacts. Many Hall Effect keyboards support adjustable actuation, rapid trigger, and analog-style input.
These features can help competitive gamers. They matter less for normal typing, email, browsing, and office work. If you want a deeper look, this guide explains whether Hall Effect keyboards are worth buying in 2026.
Do not buy Hall Effect switches for a normal MX hot-swap keyboard. They need a compatible Hall Effect board. Standard mechanical switches and Hall Effect switches are not simple drop-in swaps.
A Simple Buying Plan That Saves Money
Use this plan before you buy switches.
Pick your main use: typing, gaming, office work, quiet room, or mixed use.
Choose the switch feel: linear, tactile, or clicky.
Choose the weight: light, medium, or heavy.
Check your keyboard socket, pin support, and switch type.
Buy a tester or small sample pack.
Use the sample switches for several days.
Buy the full set with 5 to 10 extras.
Install the switches slowly.
Check for bent pins before pressing each switch into the board.
Test every key before putting the tools away.
This plan takes more patience, but it saves money. It stops impulse buys, wrong sockets, loud switches, and trendy picks that do not fit your daily setup.
Final Verdict
The best keyboard switch is not the rarest one. It is not always the most expensive one either. The right switch fits your hands, your room, your keyboard, and your daily routine.
Most users should start with a medium linear or a light tactile switch. Office users should lean quiet. Gamers should lean smooth. Shared-room users should avoid clicky switches. Hot-swappable keyboard owners should test sample packs before buying a full set.
Specs help you narrow the list. Real testing makes the final choice clear. That is the most reliable way to pick keyboard switches without wasting money.