Key remapping can make your keyboard feel faster, cleaner, and easier to use. Instead of forcing your hands to reach for awkward shortcuts all day, you can move your most-used actions to keys that sit closer to your fingers.
At first, key remapping sounds like a small tweak. Then you start using it during real work, and it feels much bigger. A single unused key can become a screenshot button, a mute switch, a paste plain text shortcut, or a quick way to open your notes app.
The goal is not to change your whole keyboard. That usually creates more problems than it solves. A better plan is to fix the small annoyances you deal with every day. For example, Caps Lock often sits unused. Print Screen can feel wasted if you already use another screenshot tool. Some function keys never get touched at all.
So, instead of accepting the default layout, you can shape your keyboard around your actual work. The result should feel natural, not complicated.
What Key Remapping Means
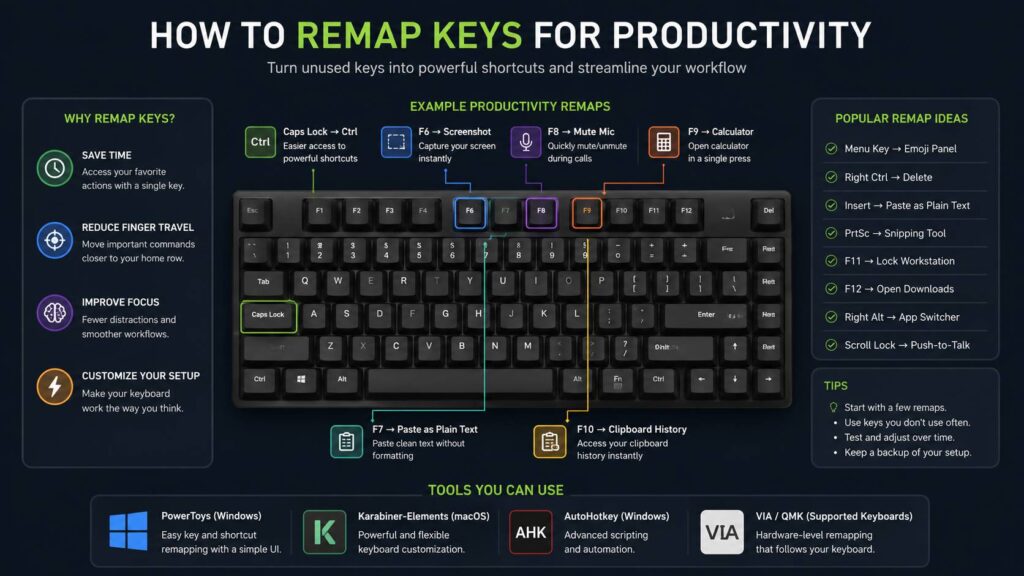
Key remapping changes what a key does. For example, you can make Caps Lock work like Control, turn F8 into a microphone mute button, or make one key open your calculator.
In practice, there are several ways to remap keys:
- Change one key into another key
- Change one shortcut into another shortcut
- Create app-specific shortcuts
- Build keyboard layers on compact keyboards
- Add simple macros for repeated work
- Move hard-to-reach actions closer to the home row
A good remap should save time without making the keyboard harder to remember. That part matters. Some people remap too much at once, then spend the next week fighting their own keyboard. Start small instead.
For most people, three to five changes are enough for the first setup. After that, you can adjust slowly as your habits become clearer.
Why Key Remapping Helps With Productivity
Most daily computer work repeats the same actions. You copy, paste, search, switch apps, take screenshots, mute calls, open files, and correct text. These tasks are simple, but they add up.
Key remapping helps by reducing hand movement. It also makes common actions easier to trigger. For example, pressing one nearby key for a screenshot feels faster than reaching across the keyboard for a multi-key shortcut.
Next, remapping can reduce mistakes. If you often hit Caps Lock by accident, turning it into Control or Escape removes a common typing problem. If you paste text from websites into WordPress, Gmail, or Google Docs, a paste plain text shortcut can save cleanup time.
In my opinion, the best productivity remaps are the boring ones. They do not look impressive, but they remove friction from work you do every day. Paste plain text, mute microphone, screenshot, clipboard history, and app switching are perfect examples.
Start With Keys You Rarely Use
Before you install anything, look at your keyboard. Which keys do you almost never press?
Good candidates often include:
- Caps Lock
- Right Alt
- Right Control
- Menu key
- Insert
- Scroll Lock
- Pause
- Print Screen
- F6 to F12
Caps Lock is usually the best place to start. Many users do not need it often, and some hit it by mistake. So it works well as Control, Escape, or a custom shortcut key.
The Menu key is another strong choice on full-size keyboards. It often sits near the right Control key and gets ignored. You can remap it to open the emoji panel, clipboard history, calculator, or a notes app.
Function keys are useful too. For example, F8 can mute your microphone, F9 can open your calculator, and F10 can open clipboard history. After a few days, those shortcuts start to feel normal.
Best Key Remaps for Everyday Work
Some remaps work well for many people. They are easy to learn and hard to mess up.
Try these first:
- Caps Lock to Control for copy, paste, undo, save, and browser shortcuts
- Caps Lock to Escape for coding, Vim-style editors, and terminal work
- F6 to screenshot for quick captures
- F7 to paste plain text
- F8 to mute microphone during calls
- F9 to open calculator
- F10 to open clipboard history
- Right Control to Delete on compact keyboards
- Menu key to emoji panel or quick notes
- Print Screen to your preferred screenshot app
For office work, Caps Lock to Control is one of the best upgrades. It keeps a major modifier key close to your left hand. For developers, Caps Lock to Escape can feel better, mainly in editors that use Escape often.
For writers, bloggers, and WordPress users, paste plain text deserves a special mention. It removes weird formatting, broken font sizes, and messy pasted content. After a week, it becomes one of those shortcuts you miss on every other computer.
How to Remap Keys on Windows
Windows users have several options, but Microsoft PowerToys is the easiest for most people. Its Keyboard Manager lets you remap keys and shortcuts through a clean interface. You do not need to edit the registry, and you can change things back later.
A simple Windows setup looks like this:
- Install Microsoft PowerToys
- Open Keyboard Manager
- Turn Keyboard Manager on
- Choose remap a key or remap a shortcut
- Select the key you want to change
- Pick the new action
- Save the change
- Test it in your main apps
For example, you can map Caps Lock to Control, F7 to paste plain text, and F8 to mute. Then test those keys in your browser, email app, notes app, and meeting app.
Next, use AutoHotkey if you need deeper control. AutoHotkey can handle scripts, app-specific shortcuts, text snippets, and window actions. It is powerful, but it needs more care. A messy script can create strange behavior, so keep each script short and clear.
One real issue with Windows remapping is remote work. Some remote desktop apps and secure login screens ignore software remaps. For this reason, keep your login keys normal and test shortcuts before relying on them during meetings or client calls.
How to Remap Keys on macOS
macOS has built-in modifier key settings. You can change Caps Lock, Control, Option, Command, and Globe from the Keyboard settings area. That is enough for common changes like Caps Lock to Control or swapping Command and Option on a Windows-style keyboard.
For deeper remapping, many Mac users choose Karabiner-Elements. It supports simple changes, complex rules, and device-specific profiles. That means your MacBook keyboard can stay normal, and your external keyboard can use a custom layout.
A practical Mac setup can look like this:
- Change Caps Lock to Control in macOS settings
- Use Karabiner-Elements for advanced remaps
- Create a profile for your laptop keyboard
- Create another profile for your external keyboard
- Test each change in Notes before using it at work
At the same time, be careful with permissions. Keyboard tools on macOS often need input-related access. If a remap stops working after a macOS update, check permissions before changing the whole setup.
Hardware Remapping With VIA and QMK
Some mechanical keyboards store remaps inside the keyboard itself. This is great for productivity because the layout travels with the keyboard. You can plug it into another computer and keep the same layout without installing extra software.
VIA and QMK are common names in this area. VIA gives many supported keyboards a visual remapping tool. QMK gives deeper firmware-level control for users who want layers, tap-hold keys, macros, and custom layouts.
If you are new to this, start with a simple VIA keyboard remapping guide before changing too much. It is easy to get excited and build a complex layout, but simple changes usually work best at first.
Hardware remapping works especially well on small keyboards. A 65 percent or 75 percent keyboard can still offer arrows, media keys, Delete, Home, End, Page Up, Page Down, and screenshot controls through layers.
For example:
- Fn + H, J, K, L can work as arrow keys
- Fn + Backspace can work as Delete
- Fn + number row can control media
- Fn + P can trigger screenshots
- Fn + M can mute audio
- Fn + C can open calculator
The main issue is compatibility. Not every keyboard supports VIA or QMK. Some brands use their own software. Others do not allow deep remapping at all. So check your keyboard model before planning a full custom layout.
Build a Productivity Layer on a Compact Keyboard
A productivity layer is a second layout hidden behind a key such as Fn. You hold Fn, then press another key to trigger a hidden command.
This works well on compact keyboards, but it needs a clear structure. Do not place shortcuts randomly. Group related actions together.
A clean layout can look like this:
- Right side for arrows and navigation
- Top row for media controls
- Backspace area for Delete
- Left side for window shortcuts
- Spacebar area for language, emoji, and clipboard tools
For example, you can keep arrow keys around H, J, K, and L. That layout works well for users who already know Vim-style movement. If not, you can place arrows where they feel easier to remember.
Next, print or save a small cheat sheet. You will forget the layout at first. That is normal. After a week or two, the most useful commands will stick.
Use App-Specific Shortcuts
App-specific remaps let one key do different things in different apps. This can be very useful if you spend most of your day in a few tools.
For example:
- In Chrome, F7 opens downloads
- In Excel, F7 inserts a row
- In WordPress, F7 pastes plain text
- In Slack, F7 toggles notification settings
- In a code editor, F7 runs tests
This works best once the action matches the app. Do not force the same shortcut everywhere if the task changes from app to app.
Logitech users can do this with Logi Options+ on supported keyboards and mice. Some keyboards from other brands have similar software. Power users can do it with AutoHotkey on Windows or Karabiner-Elements on macOS.
Still, app-specific remaps need testing. Some apps already use function keys, and your custom shortcut can block a built-in action. So test each one before you rely on it during real work.
Remap Screenshots and Clipboard Actions
Screenshots and clipboard tasks are perfect for remapping. Many people take screenshots all day, then waste time finding them later. A single key for capture can make that flow much faster.
For a cleaner workflow, map one key to your screenshot tool and another to clipboard history. Then use a naming habit or capture tool that keeps your screenshots organized. If your desktop fills up with random image files, a tool like Pool for searchable screenshot collections can fit nicely into that workflow.
Paste plain text is another must-have shortcut. It helps when copying from websites, PDFs, emails, docs, and AI tools. Instead of pasting bold text, odd spacing, or random font sizes, you paste clean text that matches your document.
In daily work, I find this more useful than fancy macros. It prevents cleanup work before it starts.
Remaps That Often Cause Problems
Some remaps sound clever but feel bad in real use.
For example, turning Spacebar into Control when held can work for some users, but it can create missed spaces or delays. Tap-hold behavior needs careful timing. Fast typists often notice small problems right away.
Putting Enter, Backspace, or Escape behind a layer can also slow you down. Those keys are too common. Keep them easy to reach.
Long macros can break too. A macro that opens several apps, moves windows, and starts a workflow can fail when one app loads slowly or shows a pop-up. Short macros are safer. A one-key screenshot or paste plain text shortcut will age better than a ten-step automation.
Shared computers create another issue. If you use a work laptop, home desktop, and client machine, heavy remapping can hurt your muscle memory. Keep your core layout simple if you switch devices often.
Step-by-Step Plan for Your First Key Remap Setup
Start with your real work, not someone else’s layout.
- List your repeated tasks
Write down the actions you do many times per day. Common picks include copy, paste, screenshots, mute, app switching, search, and plain text paste. - Pick unused keys
Choose keys that sit unused. Caps Lock, Insert, Menu, and function keys are good starting points. - Make three changes only
A good first setup can be Caps Lock to Control, F8 to mute, and F9 to screenshot. - Test in your main apps
Try your browser, email app, writing app, spreadsheet app, meeting tool, and editor. - Keep a backup
Save your PowerToys profile, AutoHotkey script, Karabiner config, VIA layout, or keyboard software profile. - Review after one week
Remove any shortcut that still feels awkward. Keep the ones that feel natural.
This slow method works better than changing twenty keys at once. You need your keyboard to feel faster, not unfamiliar.
My Recommended Starter Layout
For most productivity users, this setup is a strong starting point:
- Caps Lock to Control
- F6 to screenshot
- F7 to paste plain text
- F8 to mute microphone
- F9 to open calculator
- F10 to open clipboard history
- Menu key to emoji panel
- Right Control to Delete on compact keyboards
This layout covers common tasks without making the keyboard feel strange. It also avoids risky changes to Enter, Backspace, and Spacebar.
After that, add one or two app-specific shortcuts. For example, make one key open downloads in your browser and another run a common action in your writing or coding tool. Then stop and test it for several days.
Final Thoughts
Key remapping works best when it solves real annoyances. Do not copy a full layout from someone else and expect it to fit your hands, apps, and habits.
Start with one unused key. Turn it into something useful. Then add a few shortcuts for the tasks you repeat most. Over time, your keyboard will feel faster without feeling complicated.
A good remap fades into your routine. You stop thinking about it, and your work starts to feel smoother.