A webcam spec sheet can look simple at first. You see 1080p, 4K, autofocus, HDR, dual microphones, AI framing, a wide field of view, and a few software features. Then the webcam arrives, and the picture still looks dark, soft, too wide, too zoomed in, or strange in Zoom, Microsoft Teams, Google Meet, OBS, or Discord.
That is where many buyers get stuck. The biggest number on the box does not always lead to the best image.
For most people, the real question is not “Which webcam has the most specs?” A better question is: which webcam specs actually matter during real video calls, work meetings, streaming, and recording?
This guide breaks down the specs that make the biggest difference. You will learn what to check before buying, which features are worth paying for, and which common webcam problems usually show up after a few days of use.
Resolution Matters, But It Should Not Be Your Only Focus
Resolution tells you how many pixels the webcam can capture. The most common options are 720p, 1080p, 1440p, and 4K.
For modern use, 720p feels dated. It can work for basic calls, but the image often looks soft on larger screens. A 1080p webcam is the better starting point for work, school, interviews, and casual streaming. It gives enough detail for a clear face shot without demanding too much from your computer or internet connection.
A 4K webcam can look sharper, but only under the right conditions. You need decent lighting, a good sensor, a clean lens, and app support that does not crush the video quality. Many meeting platforms compress video heavily, so a 4K webcam does not always look like true 4K during a live call.
That said, 4K still has real value. It gives you more room to crop, zoom, and reframe the image without losing too much detail. It also helps for content recording, product demos, online teaching, and creator setups. For a deeper comparison, this guide on 1080p vs 4K webcam explains where the upgrade makes sense and where it does not.
In my opinion, a good 1080p webcam is still the best choice for most people. A strong 1080p image with natural color and clean exposure beats a cheap 4K webcam that looks noisy in normal room light.
Frame Rate Changes How Smooth You Look
Frame rate shows how many frames the webcam captures each second. Most webcams offer 30 fps or 60 fps.
A 30 fps webcam works fine for meetings, online classes, and normal calls. Your face looks natural enough, and the camera does not need as much bandwidth. For many office users, 1080p at 30 fps is perfectly usable.
A 60 fps webcam looks smoother. Hand movement feels cleaner. Product demos look better. Streaming feels more polished. If you move around during calls or record videos at your desk, 60 fps can make the image feel more natural.
Still, frame rate has a trade-off. Some webcams can shoot 4K at 30 fps but only offer 60 fps at 1080p. That is normal. For streamers and presenters, 1080p at 60 fps can be more useful than 4K at 30 fps.
Choose 30 fps for simple calls. Pick 60 fps for movement, streaming, tutorials, and a smoother on-camera feel.
Sensor Quality Matters More Than the Resolution Label
Sensor quality is one of the biggest reasons two webcams with the same resolution can look completely different.
A better sensor captures more light and keeps more detail. That means less grain, cleaner skin texture, better shadows, and a more natural image. This matters most in real rooms, where lighting is rarely perfect.
Many people work under ceiling lights, near windows, or in rooms with mixed light sources. Cheap webcams often struggle in those conditions. The camera tries to brighten the image, then the picture becomes noisy, flat, or blurry.
So, do not judge a webcam only by 1080p or 4K. Look at real low-light performance. Check whether faces look natural in normal indoor light. A camera that looks good only in a bright studio may disappoint you at your desk.
In real use, sensor quality often matters more than resolution. A clean 1080p image looks better than a noisy 4K image.
Lens Quality Affects Sharpness, Clarity, and Distortion
The lens shapes the image before software touches it. A weak lens can make the picture look soft, hazy, or stretched. A better lens keeps details cleaner and helps the webcam make better use of its sensor.
Glass lenses often perform better than basic plastic lenses. They can deliver sharper detail and better clarity, though not every glass lens is automatically great. The overall design still matters.
Wide lenses can create another issue: distortion. If the camera has a very wide field of view and you sit close to it, your face can look stretched near the edges. Your shoulders may look wider than normal, and the room can appear larger than it really is.
That may not bother everyone, but it can look odd in interviews, client calls, and recorded content. A webcam with adjustable field of view gives you more control.
Field of View Controls How Much People See
Field of view, or FOV, tells you how wide the webcam sees.
A narrow field of view keeps the frame focused on your face. A wider field of view shows more of your room, desk, shelves, chair, and background. Both can be useful, but each one fits a different type of setup.
For a solo desk setup, 70 to 80 degrees usually feels balanced. It shows your face and some background without making the shot feel too wide. For two people, group calls, whiteboards, or teaching, 90 degrees or more can help.
A very wide camera is not always better. It can show clutter, make you look small in the frame, and create edge distortion. In many home offices, a tighter frame looks cleaner and more professional.
Best practical choices:
- 60 to 70 degrees: tighter face framing
- 75 to 85 degrees: balanced home office use
- 90 degrees or more: shared rooms and wider desk setups
- Adjustable FOV: best option for mixed use
If you can, buy a webcam that lets you switch between at least two framing options. That small feature can save a lot of frustration later.
Autofocus Can Help, But It Needs to Be Stable
Autofocus sounds like an easy win. The webcam adjusts focus on its own, so your face stays sharp. In theory, that is great. In real use, autofocus quality varies a lot.
Good autofocus feels invisible. You move slightly, and the camera keeps up without drawing attention. Bad autofocus keeps hunting. The image sharpens, softens, then sharpens again. That pulsing effect can be distracting during calls and very annoying in recordings.
Autofocus helps if you show objects on camera. It is useful for product demos, documents, keyboards, gadgets, crafts, and lessons. It also helps if you move closer or farther from the screen during calls.
Fixed focus can still be better for some users. It keeps the image stable and never hunts. If you sit at the same distance every day, fixed focus can work very well.
Choose autofocus for demos and changing distance. Choose fixed focus for a stable desk setup. More features do not always mean a better experience.
HDR and Light Correction Can Save a Bad Room Setup
HDR and auto light correction help the webcam handle tricky lighting. They matter more than many people expect.
A common problem is sitting near a window. The bright window tricks the webcam. Your face becomes too dark, or the background becomes blown out. A good webcam can balance that scene better.
HDR can help with bright and dark areas in the same frame. Auto exposure can adjust brightness when the room changes. Auto white balance can correct color shifts from warm lamps, daylight, or mixed lighting.
Still, automatic correction can go too far. Some webcams make skin look too smooth, too red, too yellow, or too flat. Others keep changing brightness during a call, which can look distracting.
The best webcams let you control these settings manually. Brightness, exposure, white balance, contrast, saturation, and sharpness should be easy to adjust. Once the image looks good, save the settings if the software allows it.
For many people, better lighting will improve webcam quality more than buying a new camera. A small light in front of your face can make a cheaper webcam look much better.
Built-In Microphones Are Fine for Calls, But Not for Serious Audio
Webcam microphones are convenient. They are useful for quick calls, casual meetings, and backup audio. Many models advertise dual microphones, stereo pickup, noise reduction, or beamforming.
The problem is distance. Your webcam usually sits above the monitor. Your mouth may be 50 to 100 cm away. That gives the mic plenty of room to pick up keyboard noise, echo, desk vibration, fans, and background sounds.
For normal meetings, the built-in mic may be enough. For interviews, YouTube, lessons, podcasts, livestreams, or client presentations, a headset or separate USB microphone usually sounds much better.
So, do not buy a webcam mainly for the microphone. Video quality, sensor performance, field of view, focus, and software control matter more. Treat the webcam mic as a backup unless your audio needs are very basic.
USB Type and Cable Quality Can Limit Performance
A webcam can only perform well if the connection supports its best video modes.
Some webcams need a fast USB connection for 4K, 1080p 60 fps, or less compressed video. A poor cable, old USB hub, weak docking station, or overloaded monitor port can cause problems.
Common USB-related issues include:
- 4K mode missing
- Webcam freezing
- Video delay
- Flickering image
- Camera not detected
- Lower resolution than expected
- Random disconnects
- Poor image quality in certain apps
Start by plugging the webcam directly into your computer. Then test your hub or dock after setup. If quality drops through the dock, the webcam is probably not the issue.
Cable length matters too. Long, cheap cables can create connection problems. Use the original cable when possible, and avoid stacking multiple adapters.
Software Support Is a Real Buying Factor
Webcam software can make a good camera feel great, or it can make a good camera feel annoying.
The software should let you adjust the image clearly. It should work on your operating system. It should save your settings. It should not crash or reset everything after each restart.
Useful software controls include:
- Brightness
- Exposure
- White balance
- Contrast
- Saturation
- Sharpness
- Focus
- Zoom
- Pan and tilt
- Field of view
- HDR
- Anti-flicker
- Firmware updates
Settings memory is a big deal. Some webcams look good after tuning, then lose the settings when you open another app. That gets old fast.
Before buying, check whether the webcam software supports Windows, macOS, or ChromeOS, depending on your setup. If you use a work laptop, check whether you can install the software at all. Some company devices block extra apps.
Platform Support Helps, But It Does Not Guarantee Perfect Quality
Some webcams are certified for apps like Microsoft Teams, Zoom, Google Meet, or Chromebook. That can be useful for work. Certification often points to better compatibility, easier setup, and more predictable behavior.
Still, app support does not guarantee the best image. Meeting apps often compress video. They may lower quality based on connection speed, device load, app settings, meeting size, or platform limits.
That is why a webcam can look sharp in its preview app but softer inside a real call. This does not always mean the webcam is bad. The app may be reducing the feed.
For work calls, platform support is useful. For streaming and recording, focus more on sensor quality, output modes, software controls, and lighting.
Privacy Shutter and Indicator Light Are Small Specs With Big Daily Value
A privacy shutter does not improve image quality, but it gives peace of mind. You can physically block the camera when it is not in use.
An indicator light helps too. It gives you a clear sign that the webcam is active. For shared rooms, family spaces, schools, and work laptops, these features are worth having.
A removable cap works, but people often lose it. A built-in shutter feels cleaner and more practical.
Mounting Design Can Make or Break the Setup
Many buyers ignore the mount until the webcam arrives. Then they find out it wobbles, tilts poorly, or does not sit well on their monitor.
A good mount should hold the webcam steady. It should fit your monitor or laptop without blocking too much screen. It should allow tilt adjustment, and a tripod thread is a useful bonus for content creators.
Check for:
- Stable monitor clip
- Smooth tilt adjustment
- Tripod thread
- Strong hinge
- Cable that does not pull the camera sideways
- Weight that suits your screen
A heavy webcam can be a problem on thin laptop lids. A light webcam can feel cheap or unstable on large monitors. The right design depends on your desk setup.
AI Framing and Tracking Are Helpful, But Not Core Specs
AI framing keeps your face centered. Tracking follows you if you move. Background effects can blur your room or clean up the image.
These features can help teachers, presenters, fitness instructors, and people who move around during calls. For normal desk work, they are less useful.
AI framing can crop too much. It can move at strange times. It can reduce sharpness by zooming into the image. For a professional look, manual framing still wins most of the time.
Buy AI features only if you will actually use them. Otherwise, focus on the core camera specs first.
Webcam vs Laptop Camera: Is an External Webcam Still Worth It?
Many laptops now include better cameras than older models, but external webcams still have clear advantages. They often give better placement, wider software controls, stronger framing options, and better lens choices.
A laptop camera usually sits too low. That angle can make calls look less flattering. An external webcam can sit higher on a monitor, tripod, or arm. That alone can improve how you look on camera.
External webcams also give you more flexibility. You can choose a tighter field of view, better autofocus, stronger low-light handling, and cleaner software controls. If you are deciding whether to upgrade, this webcam vs laptop camera comparison can help you understand the real difference.
For casual chats, a laptop camera may be enough. For remote work, interviews, teaching, streaming, and recorded content, an external webcam is still worth considering.
Common Webcam Problems People Notice After Buying
A webcam can have strong specs and still disappoint you in daily use. These are the issues that show up most often.
Grainy video
The room is too dark, or the sensor is weak. Add front lighting before replacing the webcam.
Soft image
The camera may be using a lower-quality mode. Check app settings, focus, and USB connection.
Autofocus pulsing
The webcam keeps searching for focus. Lock focus manually if the software supports it.
Washed-out face
The exposure is too high, or the light is behind you. Move the light source in front of your face.
Strange skin color
White balance is wrong. Set it manually under stable lighting.
Too much background
The field of view is too wide. Choose a tighter FOV or move the camera closer.
4K looks like 720p in calls
The meeting app may be compressing the video. Internet speed and platform limits can affect quality too.
Camera settings reset
The software may not save changes, or another app may override them.
Audio sounds hollow
The webcam mic is too far from your mouth. A headset or USB mic will usually sound better.
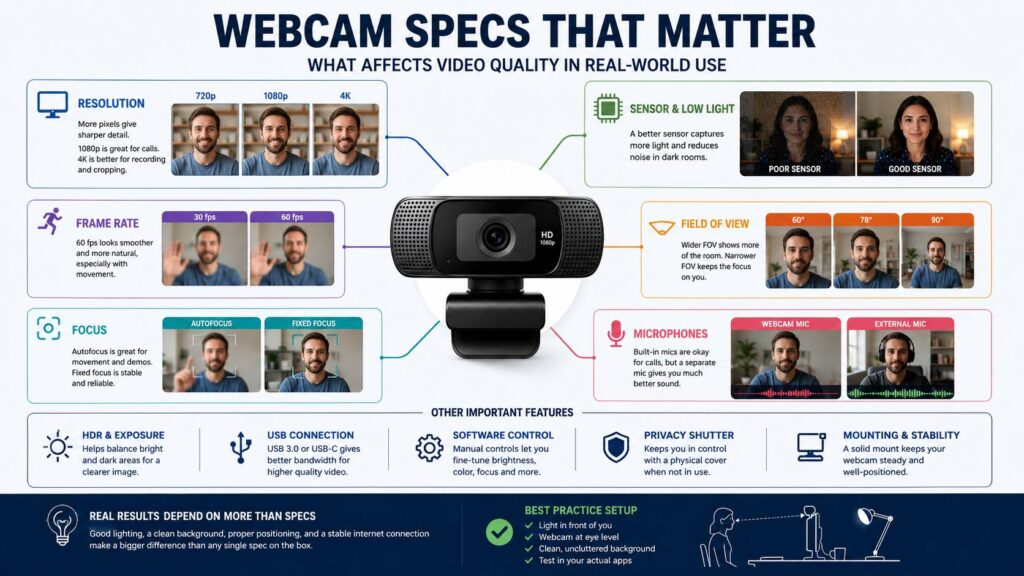
The Webcam Specs That Actually Matter Most
Here is the practical priority list:
- Sensor and low-light quality
A clean image in normal room lighting matters more than a big resolution number. - Resolution
1080p is the safe minimum. 4K helps with cropping, recording, and sharper content. - Frame rate
30 fps works for meetings. 60 fps looks smoother for streaming, movement, and demos. - Field of view
A balanced FOV keeps the frame clean and natural. - Focus type
Good autofocus helps with movement and objects. Fixed focus can be better for stable desk setups. - Software controls
Manual settings can fix exposure, color, framing, and focus problems. - USB connection
The cable, port, and hub can affect video quality more than people expect. - Mounting design
A stable mount keeps the shot steady and makes the webcam easier to use every day. - Privacy features
A shutter and indicator light are small, practical extras.
Best Webcam Specs for Different Users
For remote workers
Choose 1080p or 4K, good auto exposure, adjustable field of view, stable focus, a privacy shutter, and strong app support.
For students
Choose 1080p, simple setup, a stable laptop mount, a built-in mic, and a privacy shutter.
For streamers
Choose 1080p 60 fps or 4K 30 fps, strong sensor quality, manual controls, and stable focus.
For YouTube creators
Choose 4K, good color controls, close-focus ability, a sharp lens, and manual exposure.
For product demos
Choose autofocus, 4K, narrow FOV options, and good close-up detail.
For low-light rooms
Choose a better sensor, HDR, auto light correction, and manual exposure. Add a small light for a bigger improvement.
For shared rooms
Choose wider FOV, good framing controls, noise reduction, and a physical privacy shutter.
Final Buying Advice
Most people should not chase the highest resolution first. A good 1080p webcam with natural color, stable exposure, clean focus, and a sensible field of view can beat a cheap 4K webcam in normal room lighting.
A 4K webcam makes sense for creators, streamers, teachers, product demos, and anyone who wants more room to crop or reframe. For simple meetings, it can be more than you need.
The best webcam specs are the ones you notice during real use. Your face should look clear. Skin tones should look normal. Focus should stay steady. The frame should not show too much clutter. The camera should work well in the apps you use every day.
That is the real test. A webcam should make you look natural without forcing you to fix settings before every call.
Final Webcam Buying Checklist
Before buying a webcam, check these points:
- At least 1080p resolution
- 60 fps if you stream or move often
- Good low-light performance
- Adjustable field of view
- Stable autofocus or reliable fixed focus
- Manual image controls
- USB connection that supports the best video mode
- Software support for your operating system
- Privacy shutter
- Clear indicator light
- Solid monitor mount
- Tripod thread if you record content
- Good feedback from users who tested it in real meeting apps
If a webcam checks most of these boxes, it has the specs that actually matter. If it only has a big resolution number, keep looking.